New EO Training - Slides Summary
Welcome to the New Election Officer online training class!
This class will go over all information you need to know before your first election.
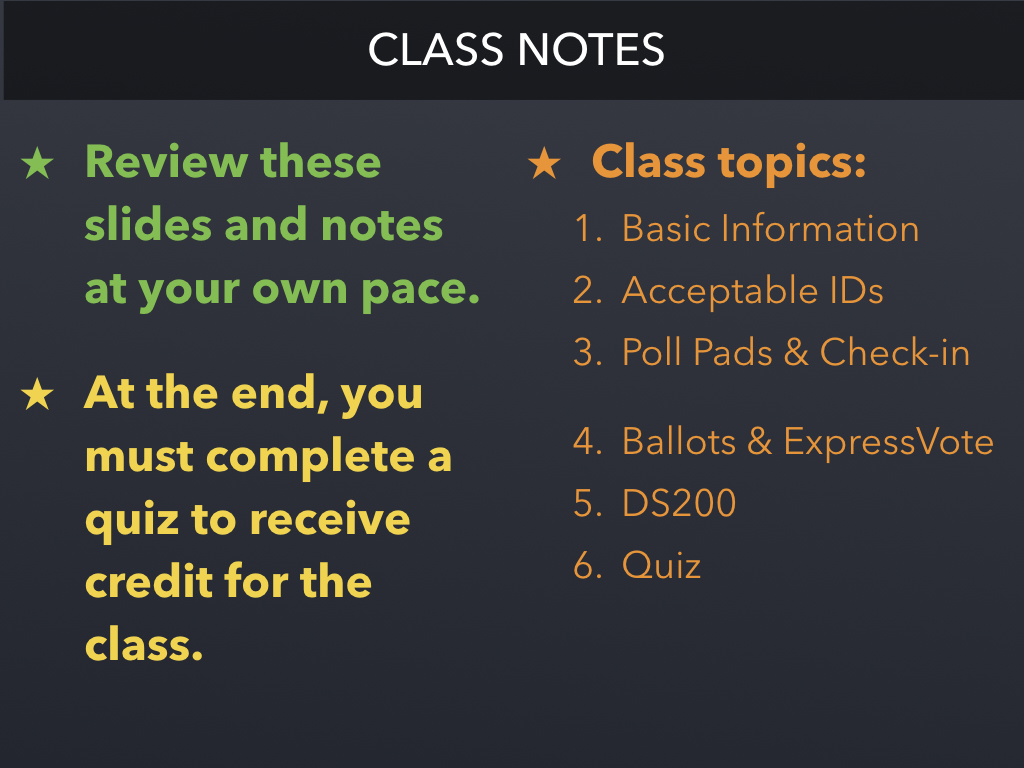
Review all information in these slides and notes at your own pace.
We will go over all information you need to know, including basic information for all election officers, which IDs you may accept from voters, how to use the Poll Pads to check-in voters, how to use the ExpressVote for voters needing help with accessibility, and how to use the DS200 ballot scanner.
At the end, you must complete a quiz to receive credit for this class.
These training materials will prepare you for any upcoming election.
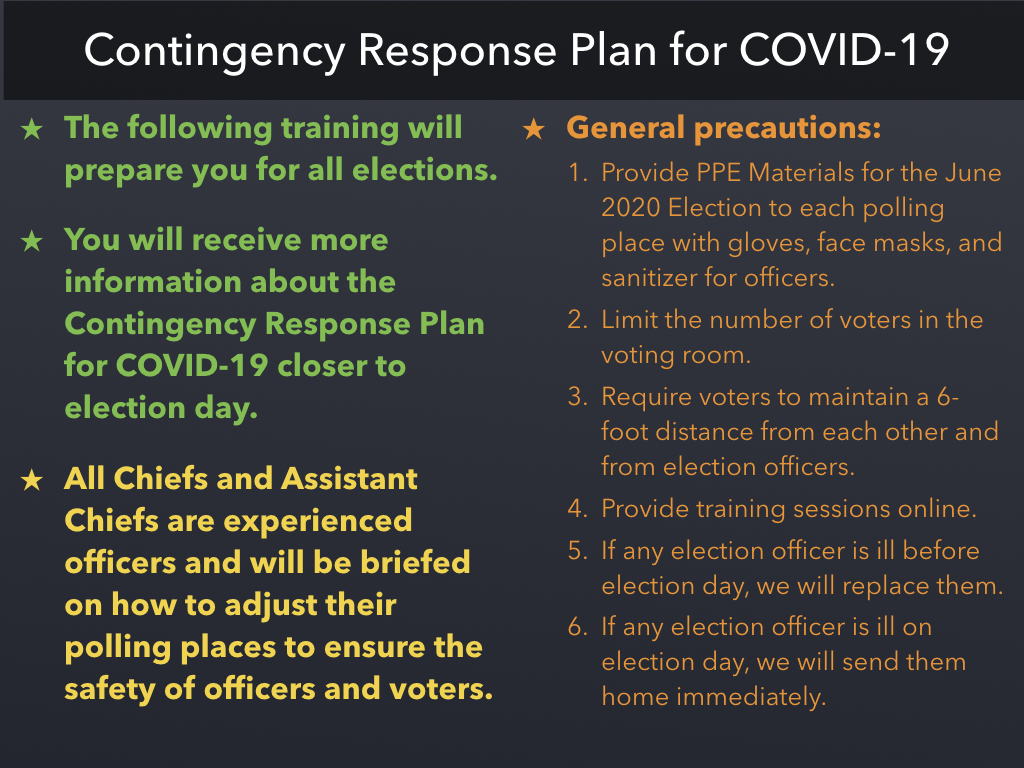
However, if you are reviewing this material in advance of the June 2020 Primary Elections, note that we are continuing to prepare and execute our Contingency Response Plan for COVID-19. Chiefs and Assistant Chiefs will receive more detailed procedures during their pre-election briefing.Election Officers will also be provided with detailed information about our Contingency Response Plan for COVID-19 before the election.
At minimum, we will provide PPE Materials for the June 2020 Election to each polling place with gloves, face masks, and hand sanitizer for election officers. We will limit the number of voters in the voting room and require voters to maintain a 6-foot distance from each other and from election officers. And if any election officer is ill before or on election day, they will be dismissed immediately and replaced if possible.

As we plan for and conduct each election, we follow four guiding principles.
These inform each step and action we take and it is important for you to read, understand, and embody these principles as well.
We will now go over the Basic Information you need to know to be a new election officer.
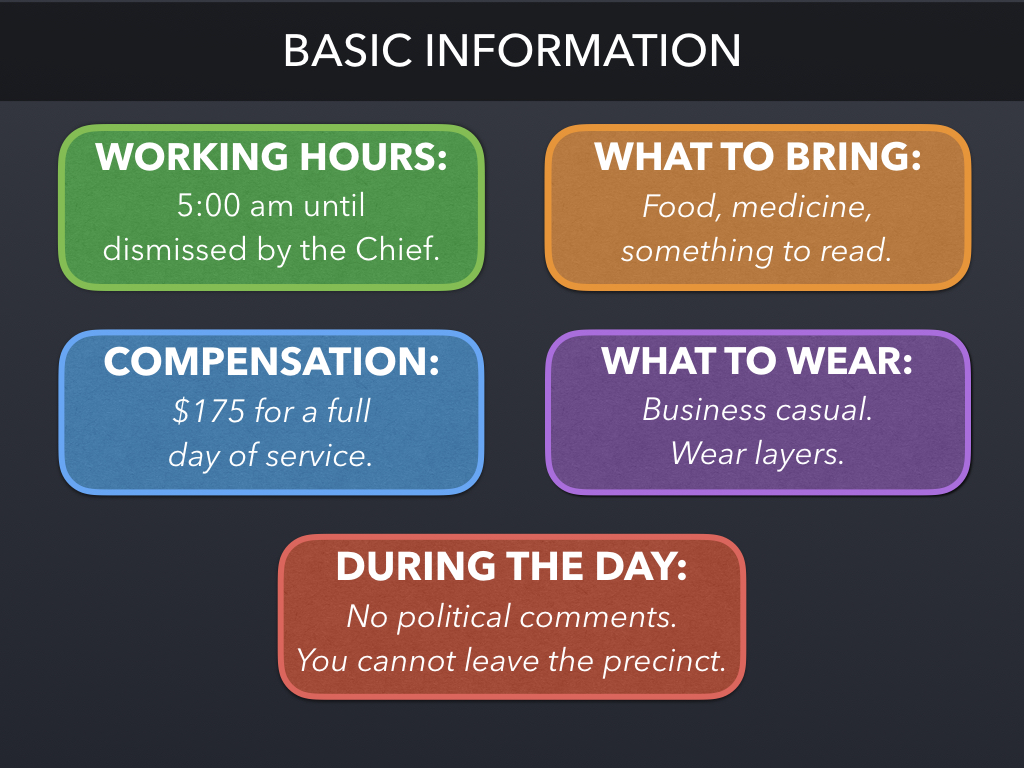
WORKING HOURS: Election officers should be at the polling place and ready to go by 5:00 AM. The day ends when all work is complete & you are released by the Chief. Voting ends at 7:00 PM and it takes most precincts 1-2 hours to finish closing the polling place.
COMPENSATION: You are paid $175 for a full day of service. Officers who arrive late (after 5:00 AM) may be penalized $25 or dismissed immediately. We strongly encourage you to set multiple alarms so this doesn't happen!
WHAT TO BRING: You should bring all food, medicine, and reading material you need for the day. Note that reading material may not be politically-oriented, such as a newspaper. You may bring electronic devices such as a phone or tablet, but you may not use them while assisting voters.
WHAT TO WEAR: Dress should be business casual. Clean, unripped jeans are acceptable. You don't know what the temperature inside the voting room will be and it can change during the day, so wear layers! Of course, clothing should not be politically-oriented or offensive in nature.
DURING THE DAY: You may not comment on candidates or political issues, current or past. It's very important to note that you can't leave the polling place during the day, so again, make sure to bring everything you need with you for the day.
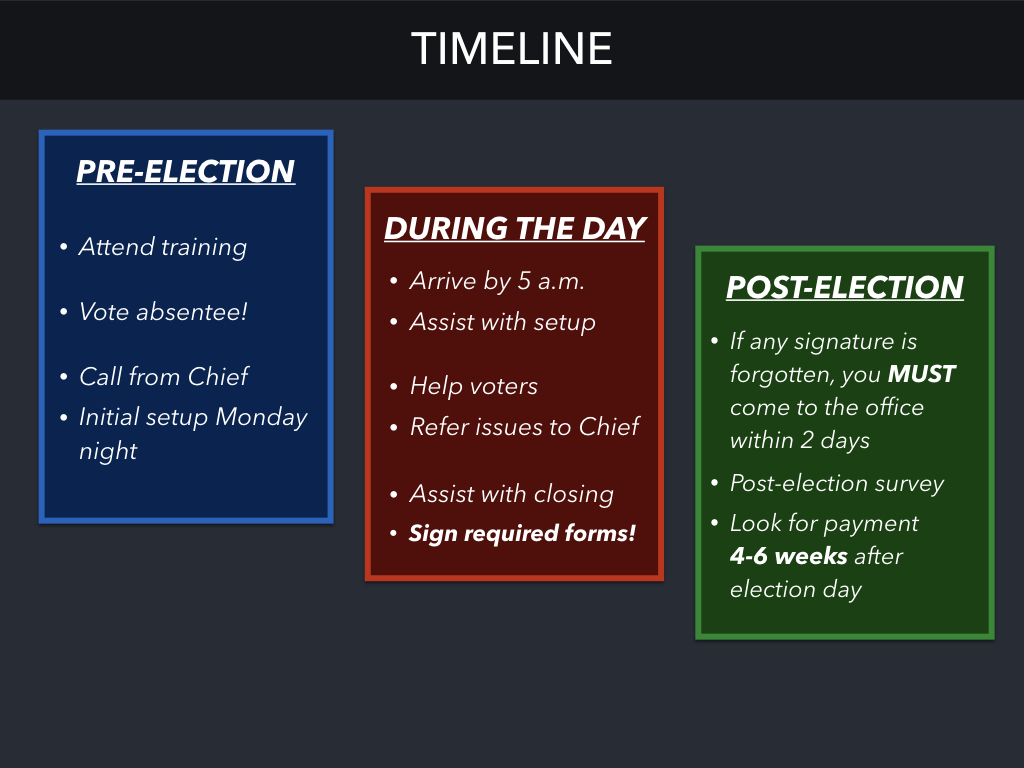
This is the timeline before, on, and after election day.
- PRE-ELECTION: We strongly encourage all officers to vote absentee, especially if you are not assigned to your home precinct (Virginia law requires you to vote in your registered precinct on election day). The week before the election, the Chief will contact each officer to go over precinct-specific information, such as the building entrance and voting room you are using. The Chief and Assistant Chief will also usually do initial setup of the voting room on the day before the election - if possible, you should try to attend and help. This will also give you a chance to review the route to your polling place if you are not assigned to your home precinct.
- DURING THE DAY: Make sure to arrive no later than 5:00 AM and help setup. During the day, you will assist voters and refer any issues to the Chief. In the evening, you will help with closing procedures and must sign some required forms.
- POST-ELECTION: If you forgot to sign a required form, you will have to come to our office within 2 days to sign! After the election, you will be asked to complete a post-election survey within 3 days. Due to Fairfax County's rolling pay schedule, you will receive payment 4-6 weeks after election day.
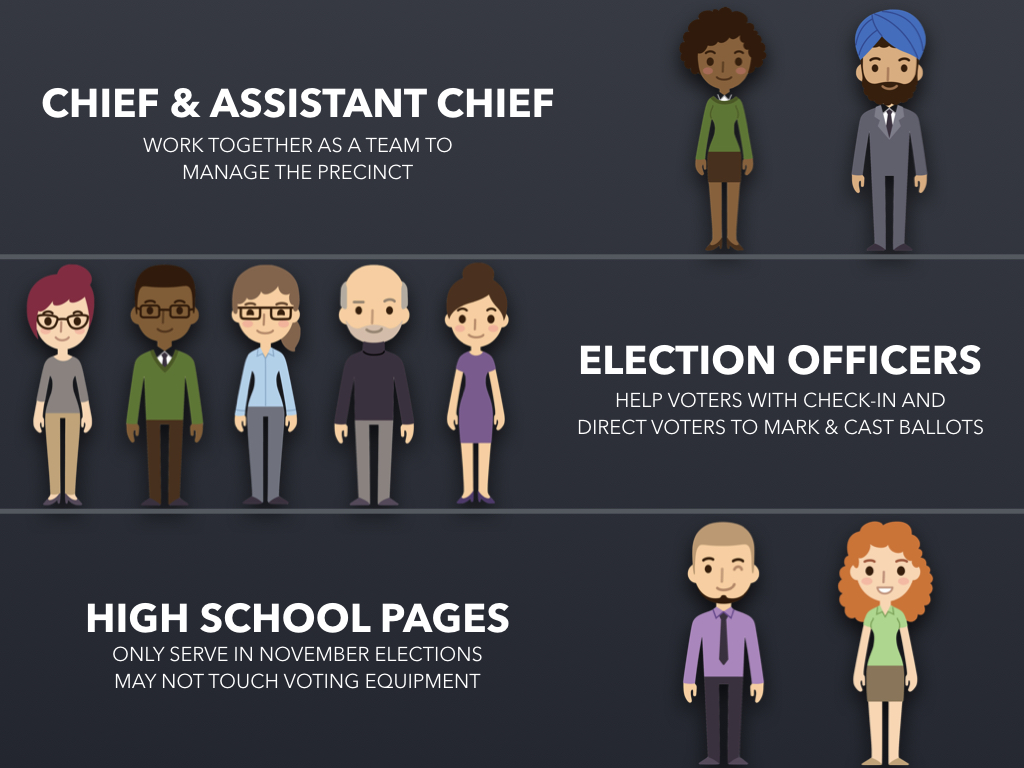
Who are the people in the polling place?
- CHIEF AND ASSISTANT CHIEF : Work together as a team to manage the polling place. They assign and rotate election officers throughout the day. Most importantly, they are trained to handle all non-routine voter situations.
- ELECTION OFFICERS : Throughout the day, regular election officers greet voters, check-in voters, issue ballots, and direct voters to mark & cast ballots. Some precincts may have Language Officers, who perform all regular officer duties but also assist voters who speak a different language, such as Spanish, Vietnamese, or Korean. (All Language Officers have been assessed for their language skills.)
- HIGH SCHOOL PAGES : Only serve in November elections. They may help in many ways, but they are not registered voters and may not touch voting equipment.
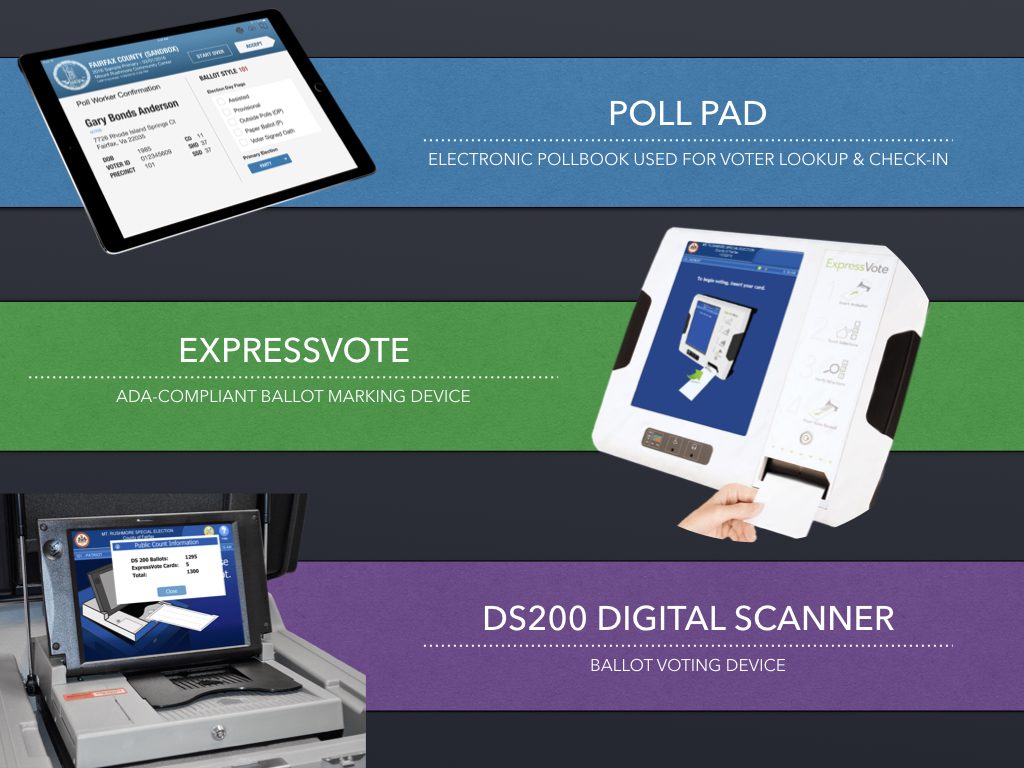
These are the 3 types of voting equipment used in the polling place. We will go into more detail about each type of voting equipment later in this training.
- POLL PAD : This is an iPad-based tablet device used to check-in each voter. It is also sometimes called an electronic pollbook.
- EXPRESSVOTE: This is a ballot marking device. It's like a big pen! It prints a marked ballot card that voters can then scan themselves. This device is especially helpful for voters who cannot read or mark a regular ballot easily.
- DS200 SCANNER: This is the device voters use to cast their ballot. It automatically scans and counts all votes.
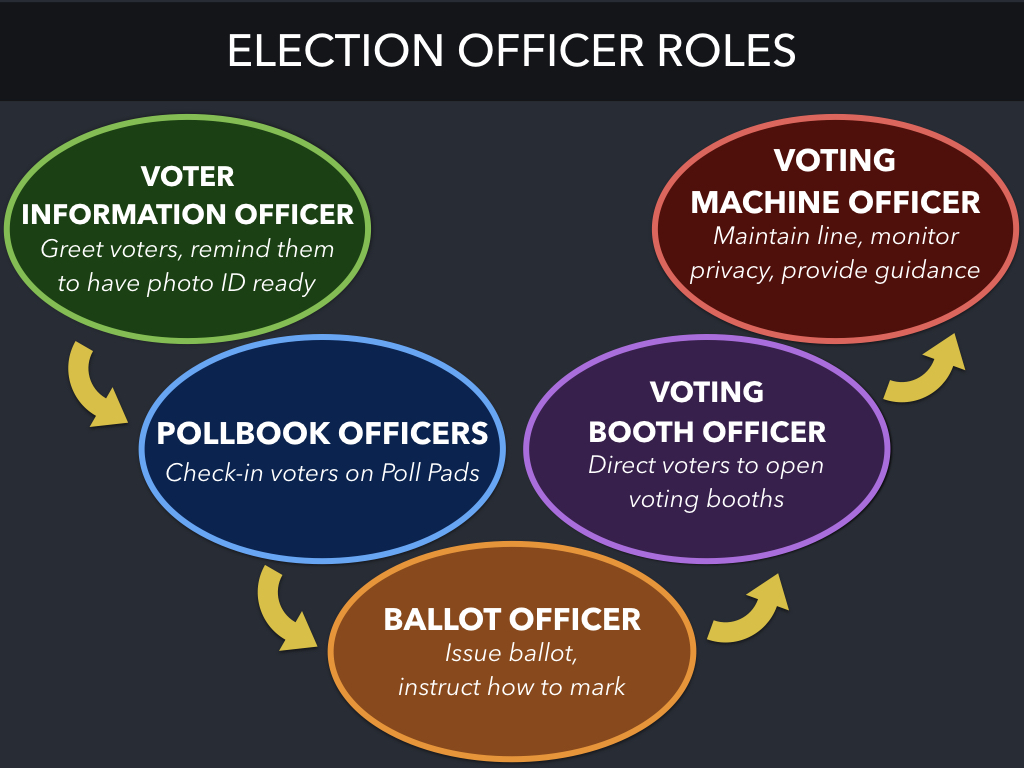
During the day, election officers may rotate among 5 main duties.
- VOTER INFORMATION OFFICER : This officer is stationed near the voting room entrance. They greet voters and confirm they are in the right polling place, remind voters to have their photo ID out and ready, and direct voters to review the sample ballot before checking-in. This person should also answer any voter questions before they get to the check-in table.
- POLLBOOK OFFICERS : These officers are stationed at the check-in tables and check-in voters on the Poll Pads. There is usually one Pollbook Officer per Poll Pad.
- BALLOT OFFICER : After a voter is checked-in, they move to the Ballot Table, where a Ballot Officer issues them a ballot in a privacy folder and provides instructions on how to mark the ballot.
- VOTING BOOTH OFFICER : This officer stands near the voting booths and directs voters to an open voting booth. If a voter has questions as they mark their ballot, they may ask this officer.
- VOTING MACHINE OFFICER : This officer guides the voter in casting their ballot and ensures the DS200 has accepted the ballot before the voter leaves. They stand at least 5 feet away from the scanner at all times for the privacy of voters. They also maintain the line and may offer an "I Voted" sticker to voters after they cast their ballot.
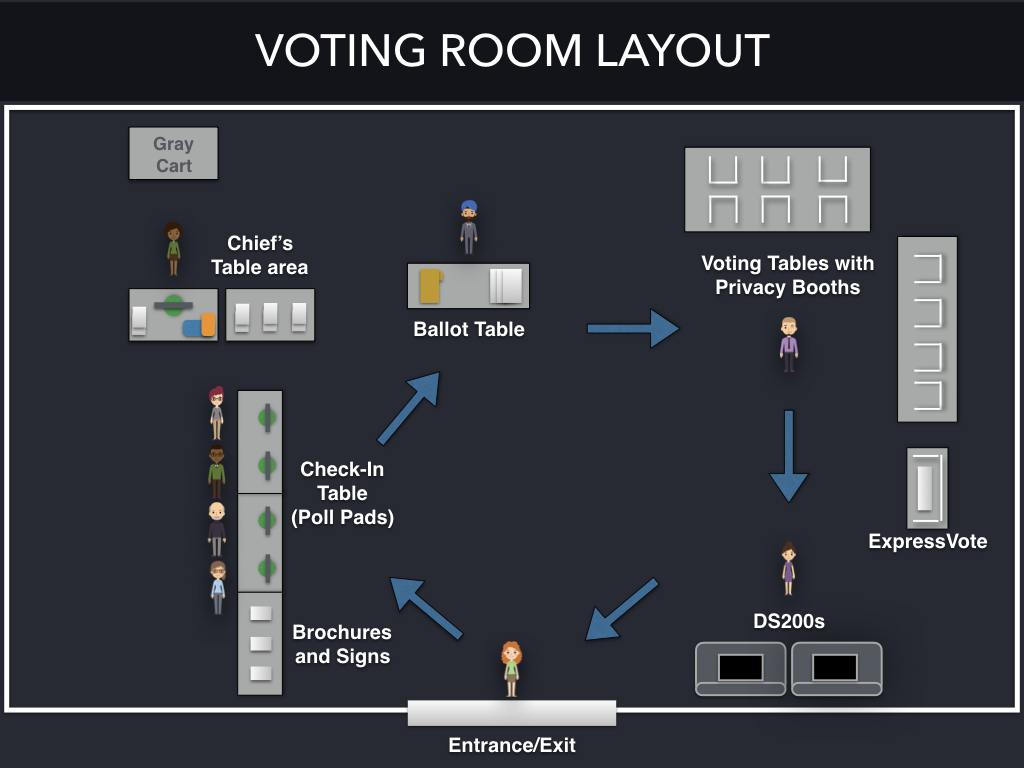
This is a sample room layout to give you an idea of the flow inside a voting room.
- In this room, the voter enters, asks any questions of the Voter Information Officer, and then proceeds to the check-in table with the Poll Pads.
- If there are any issues checking in the voter, you would direct them to the Chief's Table, where the Chief or Assistant Chief may help resolve the issue.
- After the voter is checked in, they move to the Ballot Table where they will receive their ballot. Each ballot is inserted in a privacy folder.
- After receiving a ballot, the voter goes to the voting tables and sits in an empty privacy booth.
- If the voter elects to use the ExpressVote accessible marking device, an officer should guide them there. Note that the ExpressVote also has a privacy booth around it.
- Lastly, the voter moves to the DS200, scans their ballot, and exits the room.
The voting room should always be set up to have the voter move in a circular fashion, with an election officer at each station to help guide them.
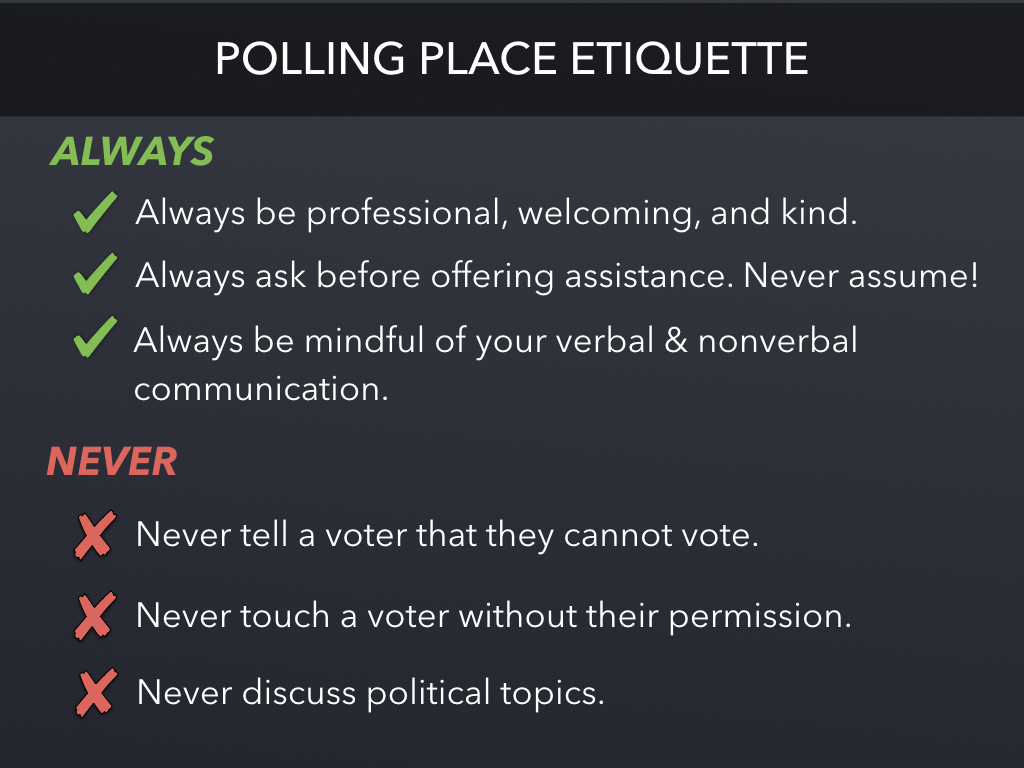
As an election officer, it is vitally important to always be professional and polite in the polling place. Always ask before assisting a voter - sometimes, they may not want assistance. Be mindful of your communication at all times.
For the June 2020 election, you must also always exercise social distancing and keep 6-feet between yourself and all others in the voting room. You will also have face masks, gloves, sanitizer, and other materials as part of our Contingency Response Plan for COVID-19.
You should never tell a voter that they cannot vote - instead, direct them to the Chief or Assistant Chief, who can offer them a provisional ballot. Do not touch voters without their permission. Avoid all political topics, especially anything that may be on the ballot.
Perception is everything, so always be aware of your words and actions. You are representing the county! If you have any questions or are unsure of what is acceptable or not, contact us before or on election day.
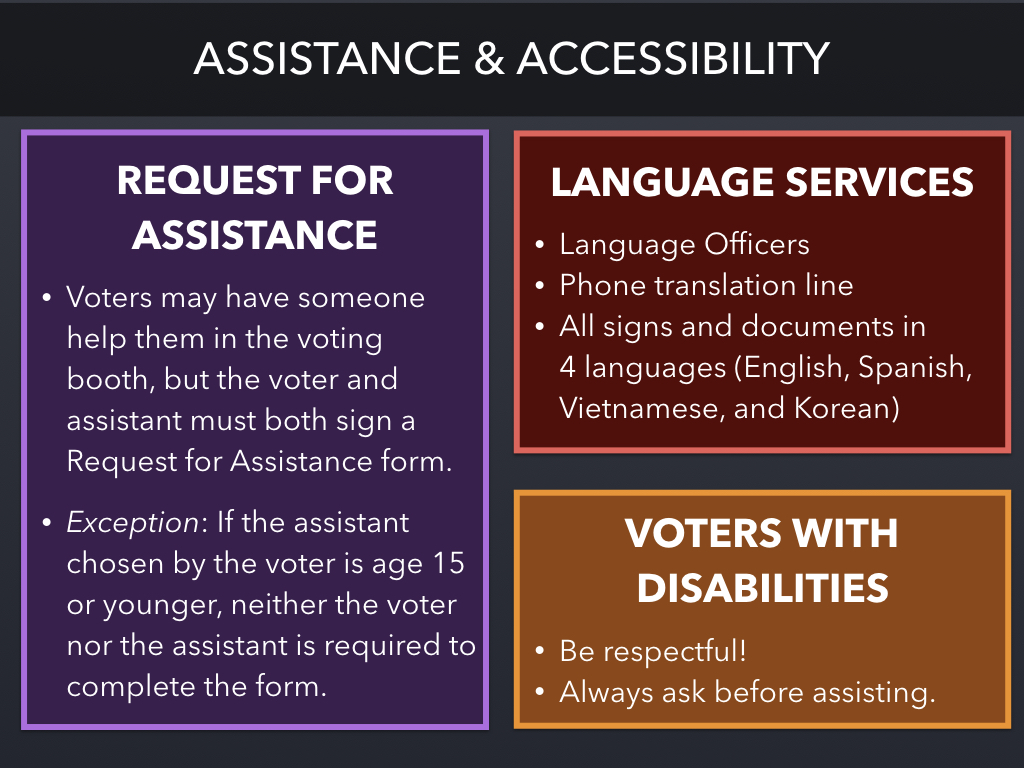
REQUEST FOR ASSISTANCE: If a voter needs help in the voting booth, there is a procedure in place for that which the Chief handles. The voter selects an assistant and both must sign the Request for Assistance form. The assistant can be a family member or friend with them. The assistant can also be an election officer such as you! Note that if the assistant is 15 or younger, no form is required.
LANGUAGE SERVICES: If voters need help in another language, we offer multiple services. For example, many precincts are assigned Language Officers, who have been assessed for their language skills and can help translate (if a Language Officer assists a voter in the voting booth, they would complete a Request for Assistance form). There is also a phone translation service for more than 100 languages. All signs and documents are also translated into 4 languages: English, Spanish, Vietnamese, and Korean.
VOTERS WITH DISABILITIES: If a voter appears to have a disability, be respectful and always ask before assisting them. If a voter has limited vision or impaired hearing, you can inform them they can use the ExpressVote to mark their ballot.
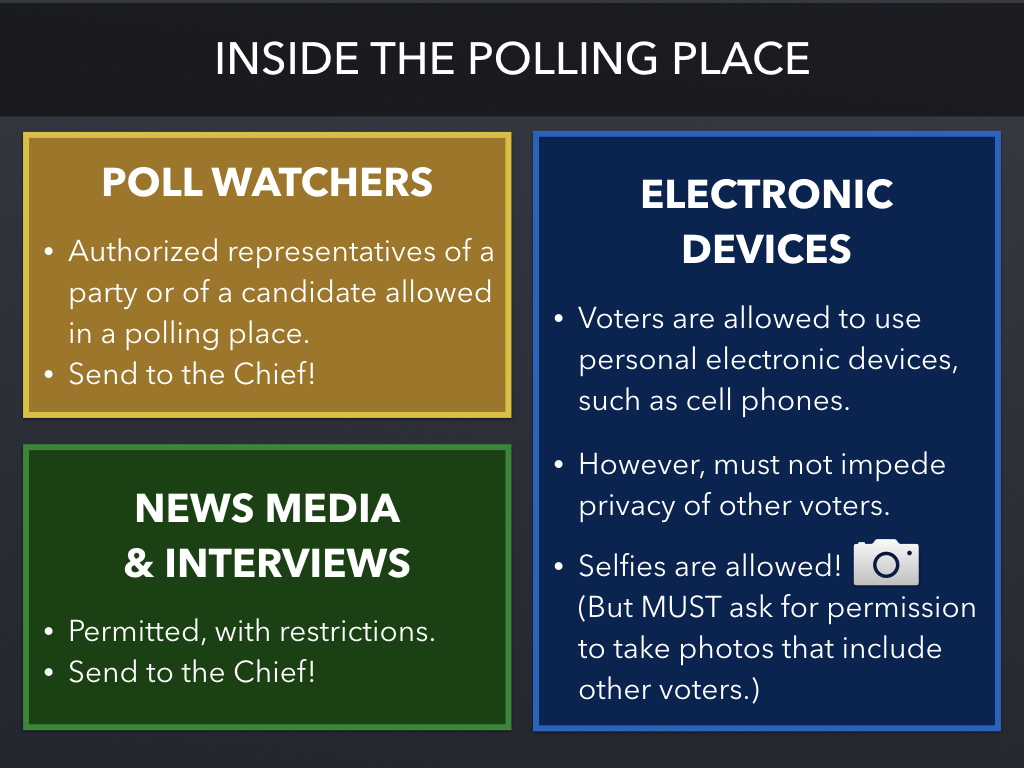
POLL WATCHERS: Authorized representatives of a party or candidate. Poll Watchers are allowed anywhere inside a polling place as long as they don't impede voters or touch voting equipment. Poll Watchers may stay and observe closing procedures; but if they do, they cannot leave the room or report results early.
NEWS MEDIA & INTERVIEWS: Call the Chief if someone wants to interview you! You may provide basic facts (e.g. number of voters checked in), but do not give opinions or forecasts. For anything further, call the Office of Elections.
ELECTRONICS: Voters ARE allowed to use personal electronic devices inside a polling place to take photos, make calls, etc. They are also allowed to take a "selfie" of themselves and/or their ballot. If they want to take a photo that includes other voters, they must ask for and receive permission from those voters first.
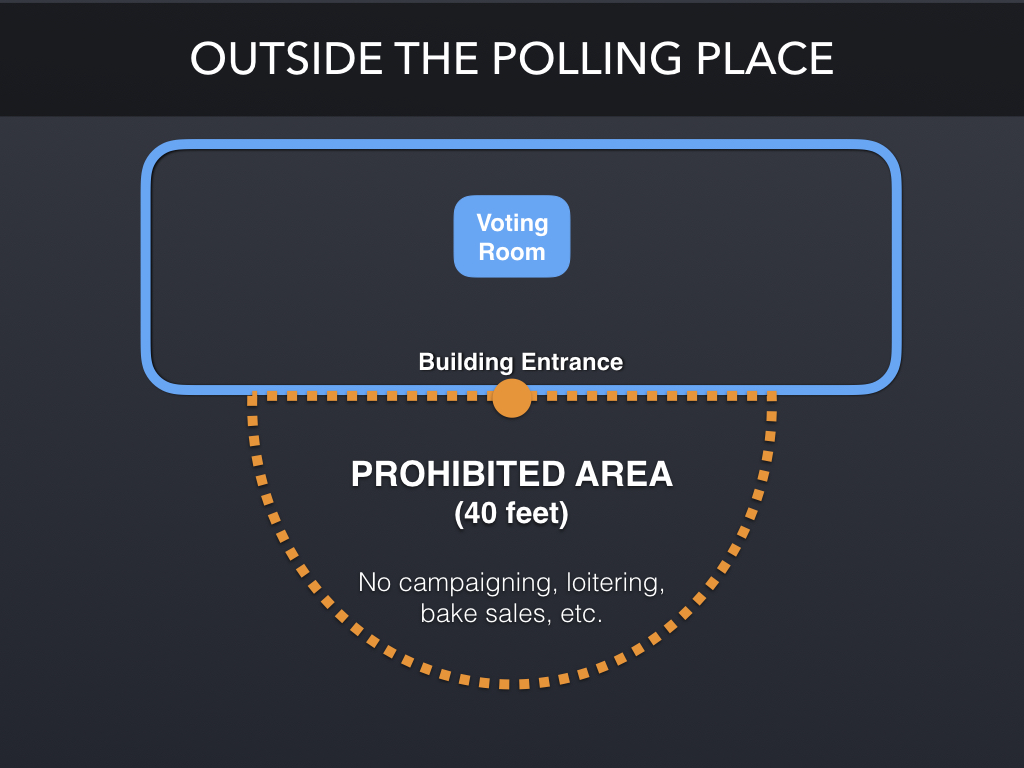
Outside the polling place, there is a 40-Foot Prohibited Area , which provides voters unimpeded access to the building.
State law does not permit loitering, congregating, or electioneering within 40 feet of a polling place entrance (i.e. the building entrance, NOT the voting room entrance). Restricted activities include campaigning, handing out flyers, and bake sales.
These activities are permitted outside of the 40-foot Prohibited Area.
We will now go over Acceptable IDs and the steps for checking-in each voter.
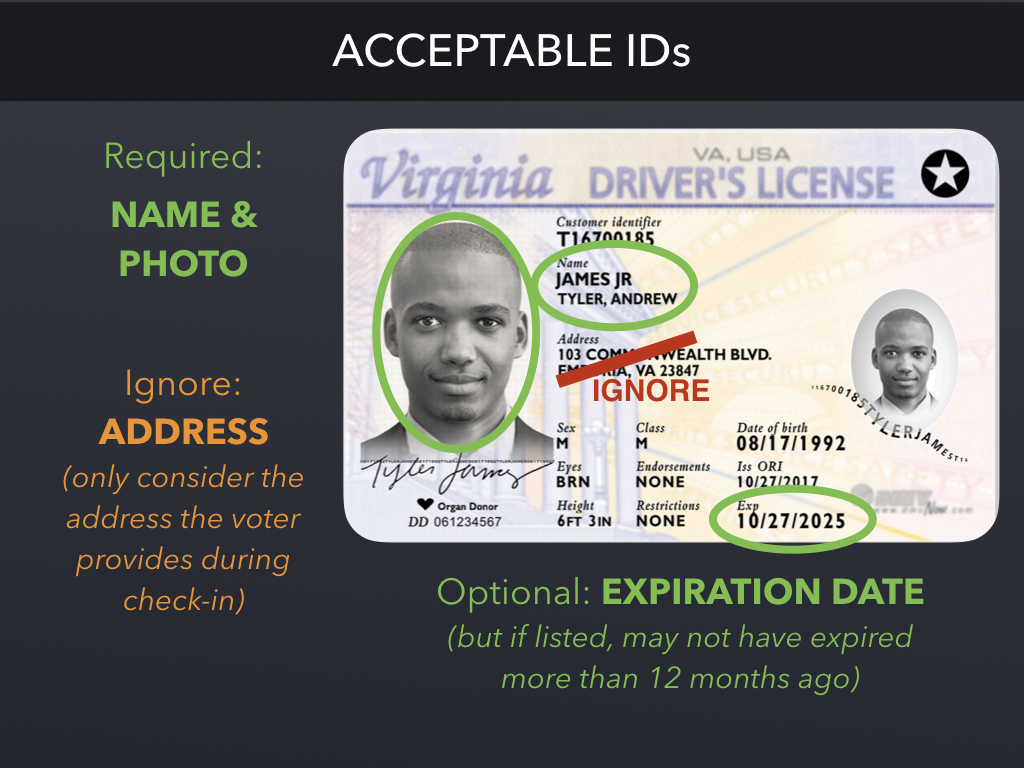
There are certain things you must look for on any ID a voter presents:
- Is there a name and photo? All IDs must have both to be eligible for voting.
- Is there an expiration date? This is optional. But if there is an expiration date listed, it must not have expired more than 12 months ago. (Yes, that means a voter can present a recently-expired ID.)
- Ignore the address, if listed. Instead, you will only consider the address the voter provides you during the check-in process.
NOTE: You may have heard the law regarding photo IDs recently changed. This does not take effect until July 1, 2020, which is after the June primary election. We will provide more information about the exact changes at that time.
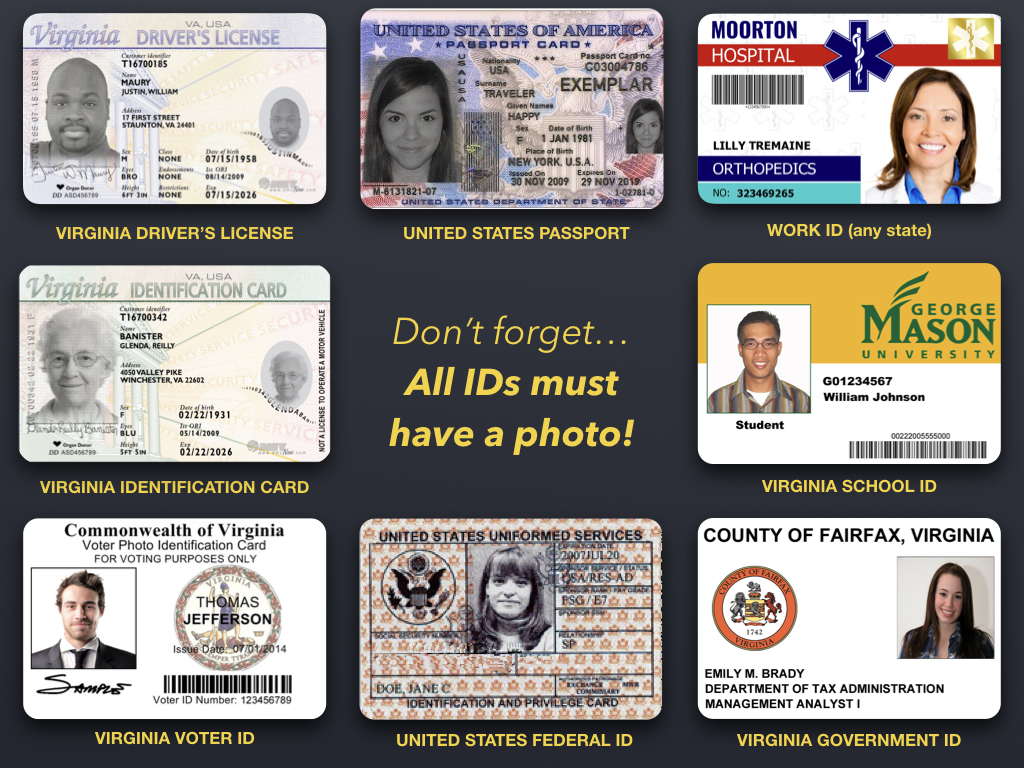
Here are some samples of valid IDs. It includes:
- Virginia driver's license
- Virginia identification card (sometimes colloquially referred to as a "walker's license")
- Virginia voter ID with photo (note that it has an issue date, not an expiration date)
- US passport or US passport card
- US federal or military ID
- Work ID
- School ID from a school with a campus in Virginia
- Government ID from a government located in Virginia
Again, note that many of these IDs do not have an address or expiration date, but they are still valid for voting.

There are also many IDs that you cannot accept for voting.
- A Virginia driver's license is OK, but an out-of-state driver's license is not.
- An ID from a school with a campus in Virginia is OK, but an ID from a school with no presence in Virginia is not. (On election day, the Chief has a list of all colleges and universities with campuses in Virginia.)
- A US passport is OK, but a foreign passport is not.
- A voter ID with a photo is OK, but an older voter ID without a photo is not.
- An ID from a person's employer, regardless whether they are located in Virginia, DC, Maryland, or elsewhere is OK. But other non-government and non-school IDs, such as a credit card or Costco membership card, are not OK.
You will have a full list of acceptable IDs at the check-in table on election day.
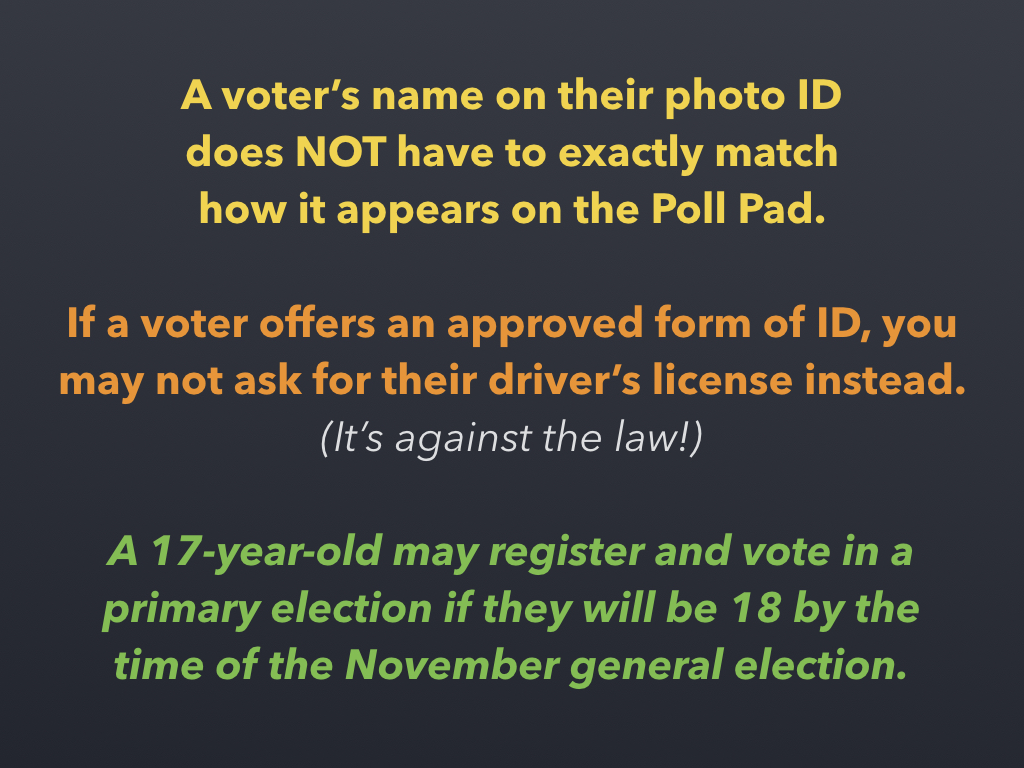
The name on someone's photo ID does not have to exactly match how it appears on the electronic pollbook. For example, someone's ID may say "Bill" but the pollbook says "William". As long as you can reasonably confirm the person in front of you is the person in the pollbook, you may check them in.
Also, if someone provides you a different form of ID, you may not ask for their driver's license instead just because it's easier to scan on the Poll Pads. This is against the law! In fact, we often get called in the office when this happens. If you notice a fellow officer doing this on election day, alert the Chief or our office.
Lastly, you may sometimes get voters who are 17-years-old in a primary election. If they are registered and listed in the Poll Pad, they are permitted to vote! The law says that any registered voter who will be 18 by the time of a general election may vote in its corresponding primary.

If a voter does not present an acceptable form of ID, you should always call the Chief! They are trained on alternatives, including:
- The voter always has the option to complete a Provisional Ballot and submit their ID later. (Some people think provisional ballots are only counted in close elections. Actually, the Electoral Board reviews all provisional ballots and every ballot they accept is included in the official results of the election.)
- The voter can return with an acceptable ID. However, many voters who say they will return later often do not, which is why we encourage Chiefs to still offer a provisional ballot in this situation.
- The voter can get a temporary photo ID from the Office of Elections. If they come to our office, we can take their photo and print a temporary ID, as you can see in the picture. These temporary IDs are treated like any other ID and are accepted for 1 year past expiration.
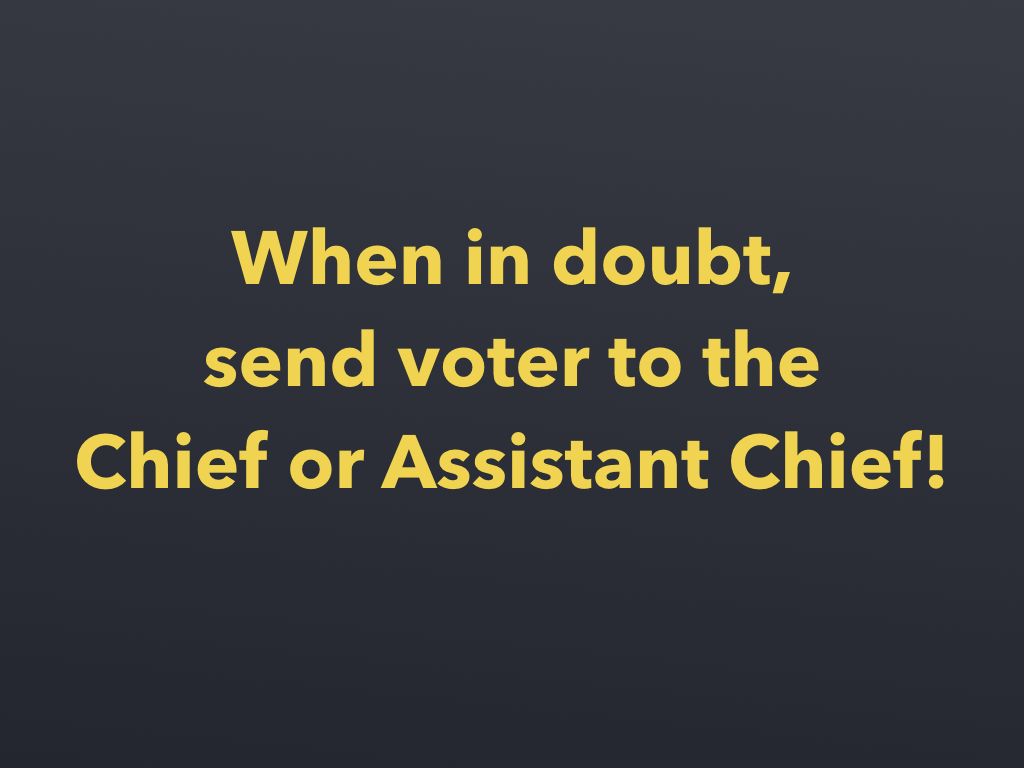
If you're not sure how to handle a situation, send the voter to the Chief or Assistant Chief! The Chief and Assistant Chief are trained to handle non-routine voters and other issues. If the Chief or Assistant Chief can't figure it out, they will call our office for assistance.
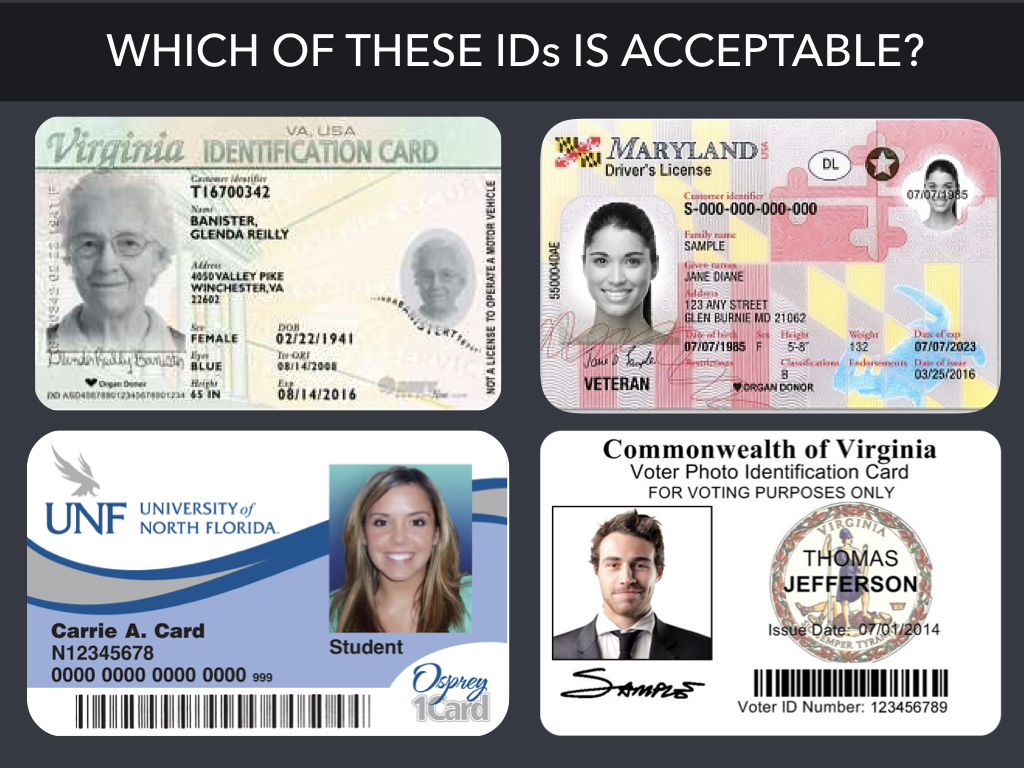
Let's do a quick review. Which of these IDs is acceptable? Which is not? Why? Take a moment to think about these questions before you read the answer below.
- TOP LEFT: This is a Virginia identification card, which is on the list of valid IDs. However, look at the expiration date - it expired in 2016, which is more than 12 months ago. That means it is not acceptable.
- TOP RIGHT : This is a Maryland driver's license. This is an out-of-state license, which is not on the list of valid IDs. Therefore, it is not acceptable.
- BOTTOM LEFT : This is a school ID from the University of North Florida. As this university does not have a campus in Virginia, it is not acceptable.
- BOTTOM RIGHT : This is a voter ID with photo. You may see the 2014 date and think that automatically disqualifies it. However, remember the date that is listed is an issue date, not an expiration date. So this ID is acceptable for voting.
We will now go over the Poll Pads and how to use them on election day.
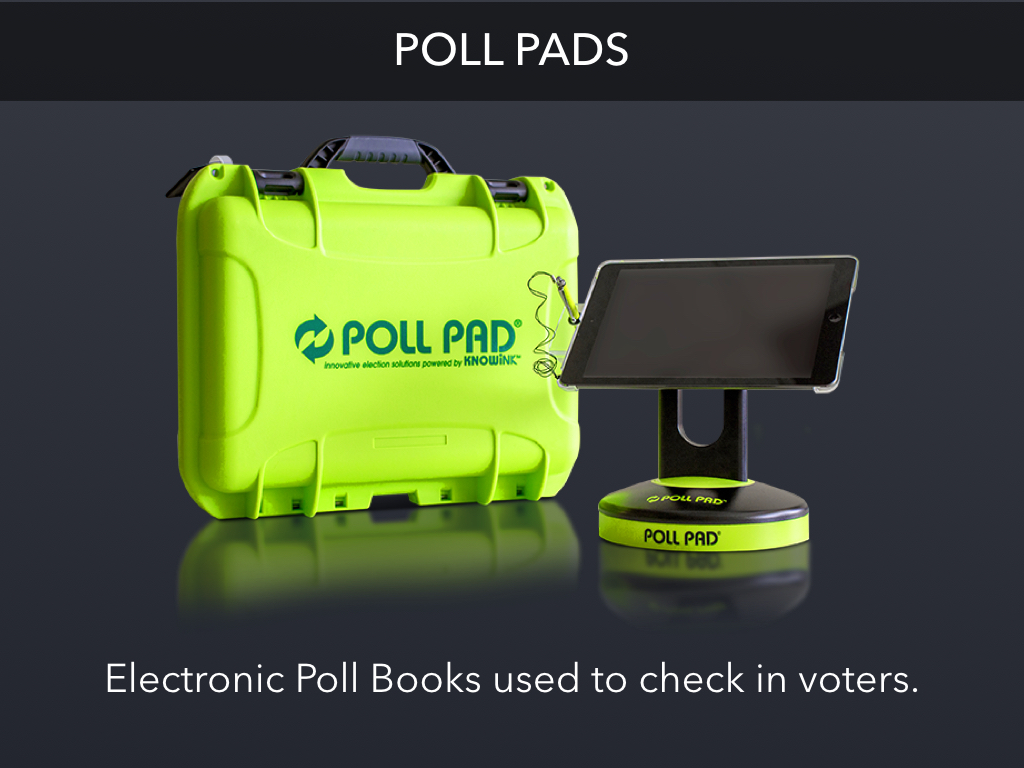
In Fairfax County, we use Poll Pads as our electronic pollbooks. These are iPad-based devices used to check-in voters. They synchronize with each other wirelessly. It's a lot easier than having to check people in on paper, like we used to!
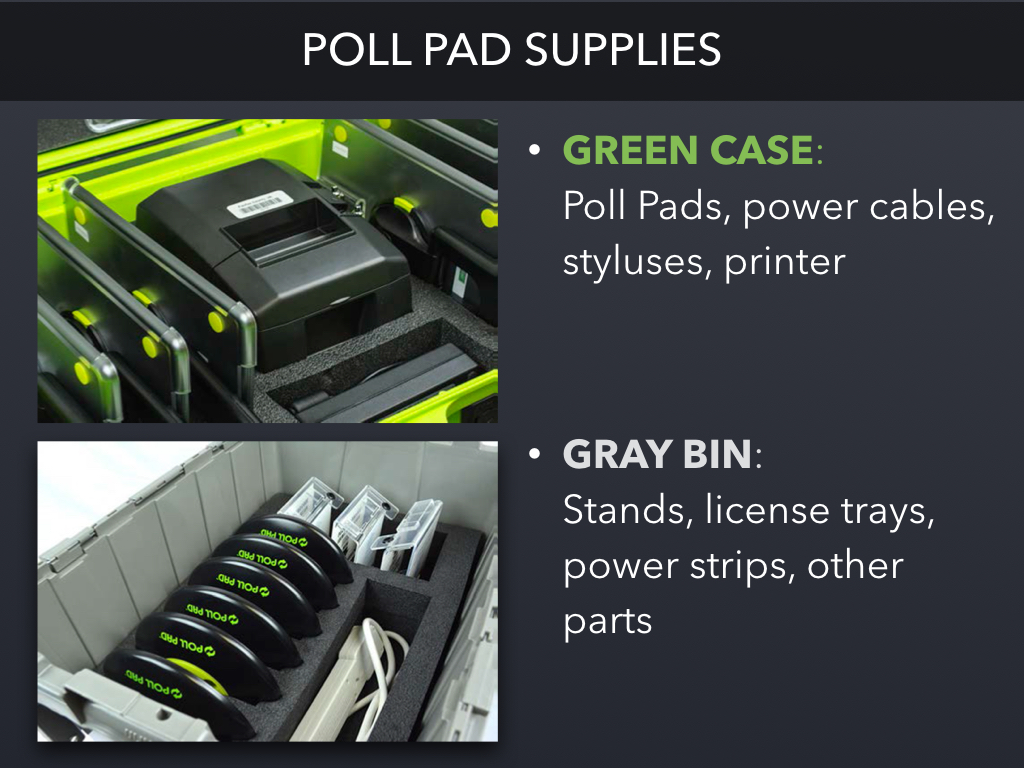
Poll Pads arrive in your polling place in two separate cases.
- The green case holds up to 6 Poll Pads, power cables, and a printer.
- The gray bin holds the stands, driver's license trays, extension cords and power strips, and other various parts.
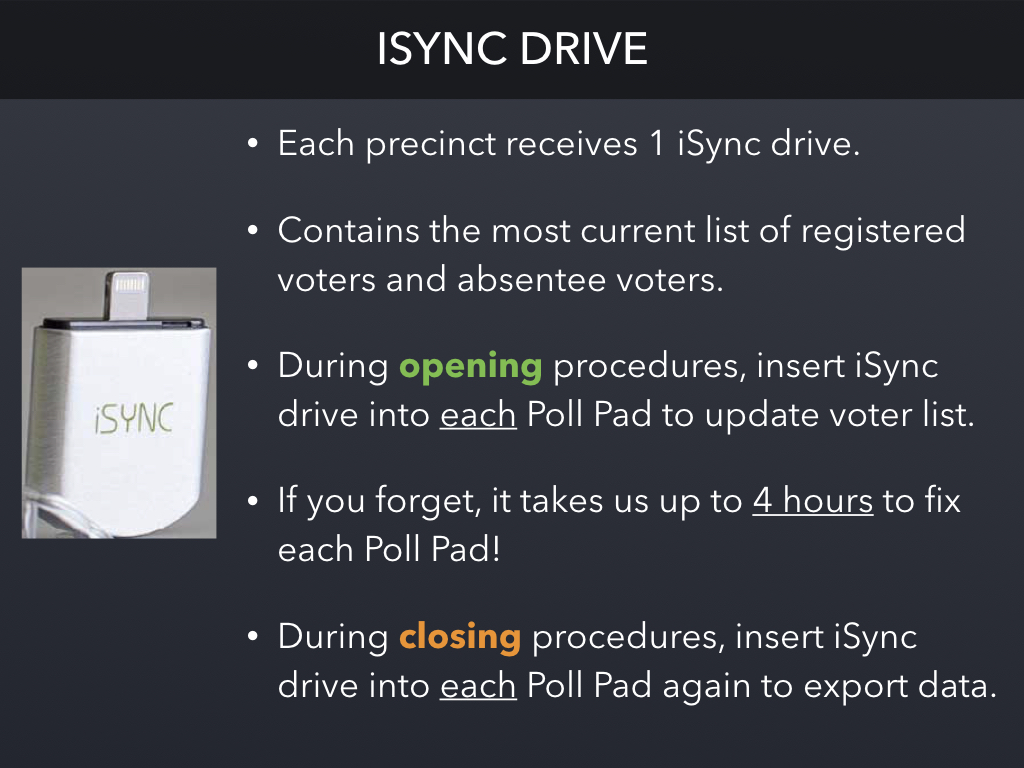
Each precinct receives 1 iSync drive, which is a small "thumb drive" that must be inserted in Poll Pads individually to update them. The iSync drive contains the most current list of registered voters and absentee voters.
You may ask, why do we need to use an iSync drive? Poll Pads must be prepared 2 weeks before election day so we can send them to your polling place in time, but do not include the final absentee voters or last-minute changes to voter registration. iSync drives are prepared 2 days before election day, after voter registration and absentee voting have ended. That's why it's so important to use the iSync drive to update your Poll Pads in the morning!
OPENING PROCEDURES: During opening procedures, insert your iSync drive into each Poll Pad to update it. If a precinct forgets to update a Poll Pad, it will have an older list of voters and it can take the Office of Elections up to 4 hours to reconcile the data for each Poll Pad.
CLOSING PROCEDURES: During closing procedures, insert your iSync drive in each Poll Pad to export the final voter list. If your Poll Pads do not wirelessly synchronize properly during the day, we can reconcile the data using the exports on the iSync drive.
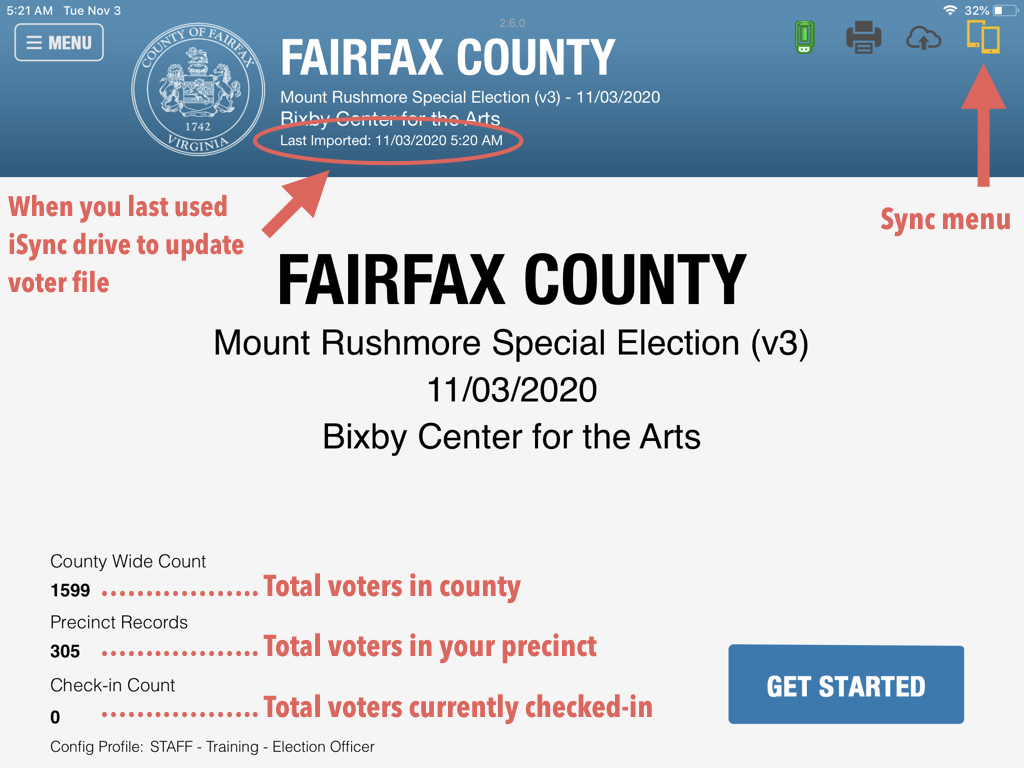
This is a screenshot of what each Poll Pad should generally look like on election day after using the iSync drive.
- TOP LEFT : The "Last Imported" date should be the day of the election, if you correctly imported the updated voter file from the iSync drive.
- TOP RIGHT : The "Sync menu" indicates whether the Poll Pad is wirelessly synchronizing with the other Poll Pads in the precinct. You can open this on election day for more detailed information.
- BOTTOM : The "County Wide Count" shows how many registered voters there are in the county. On election day, this will show 700,000+ voters.
- BOTTOM : The "Precinct Records" number shows how many registered voters there are in your precinct. On election day, this will show approximately 1,000-5,000 voters in your precinct.
- BOTTOM : The "Check-in Count" shows how many voters you have checked in on this Poll Pad. As you check-in voters on election day, this number will increase. (The number of voters checked-in across all Poll Pads is accessible in the Summary Report.)
Remember to keep your Poll Pads within 30 feet of each other so they may synchronize with each other throughout the day. If they stop synchronizing, bring them closer together or call the Chief.
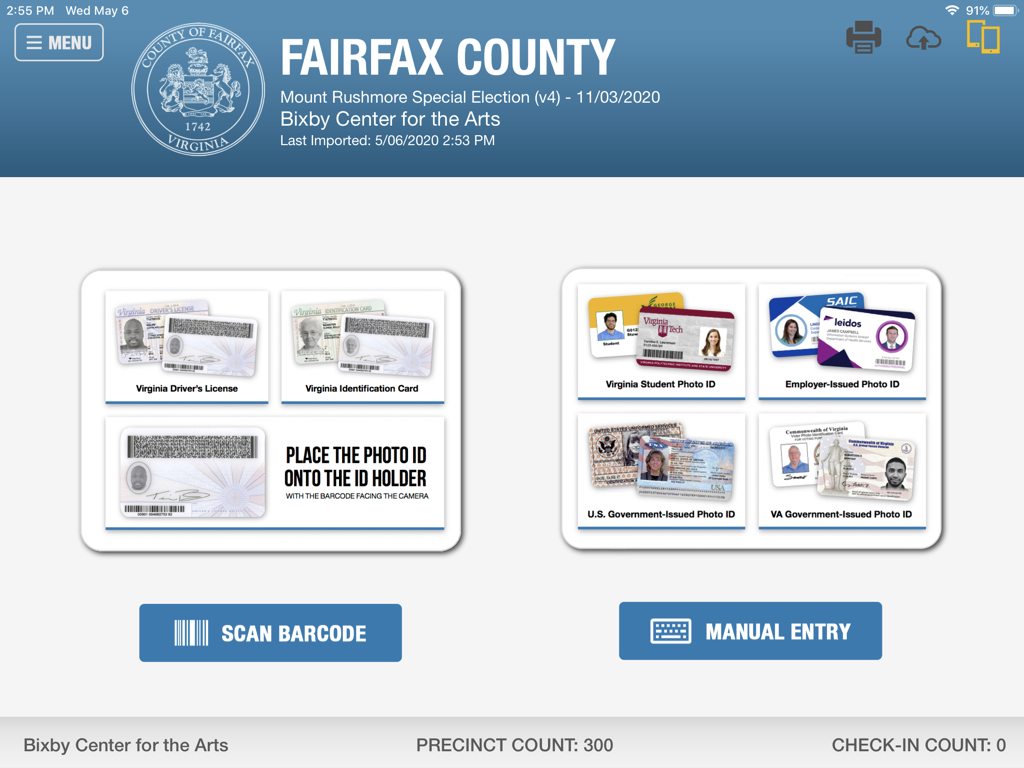
When you press "Get Started" on the Poll Pad's home screen, it brings you to this screen.
- Press "Scan Barcode" to scan a voter's driver's license. This is how you will check-in most voters.
- Press "Manual Entry" to search for a voter by name. This is how you will check-in voters who present a valid form of ID that is not a driver's license.

Scanning a voter's driver license is very easy! You simply place the license in the scanning tray, which is attached to the back of the Poll Pad. Make sure the barcode is facing the Poll Pad camera. Then the Poll Pad will scan the barcode and open the voter's record automatically.
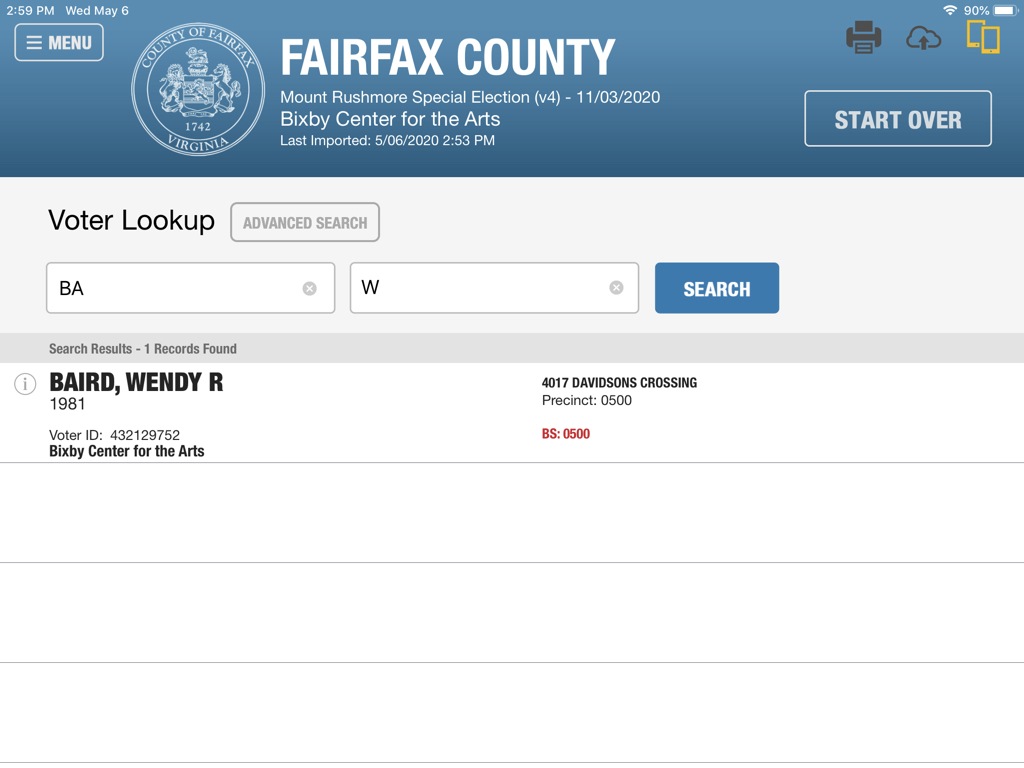
If you cannot scan a voter's ID, you will need to search for them manually. When doing a Manual Search, always search for 2 letters of the voter's last name and 1 letter of the voter's first name. If you type more than this, it will take longer and lead to more mistakes.
If you cannot find a voter by name, you can click to do an Advanced Search. This will allow you to look them up by other identifying information, such as their address.
When the list of voters is displayed, tap on the name of the voter who you are checking-in. Be careful not to select the wrong person, such as John Smith Jr instead of John Smith Sr.
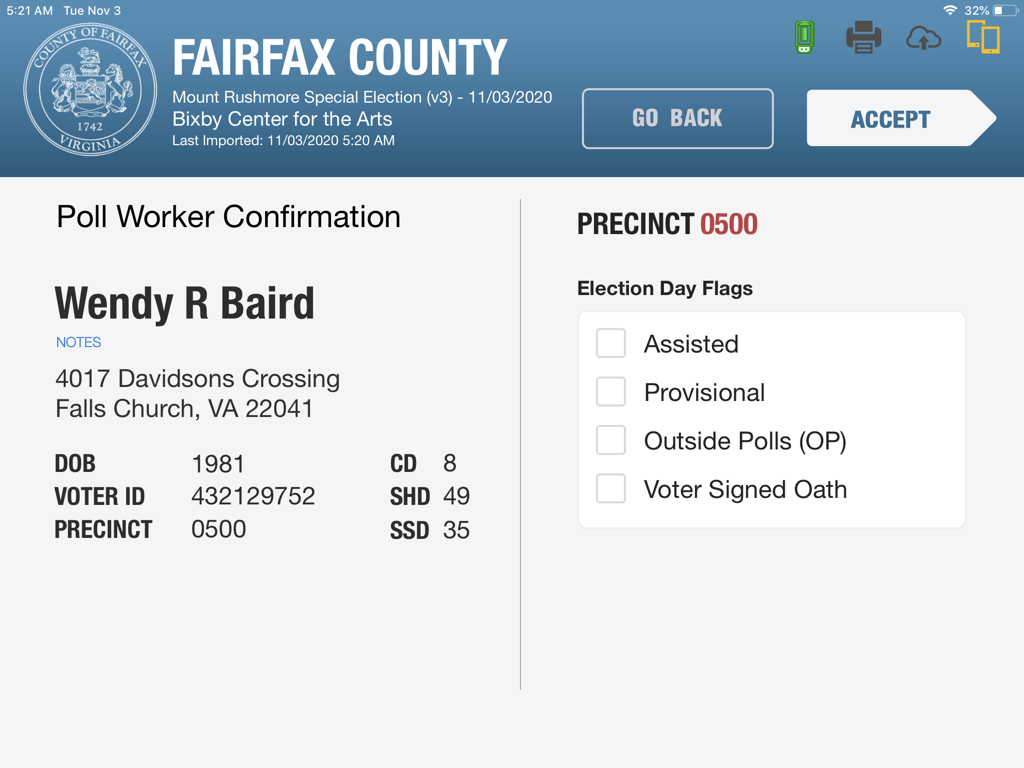
When you select a voter to check-in, you will be presented with their voter information. This is a final opportunity to confirm you are checking in the right person.
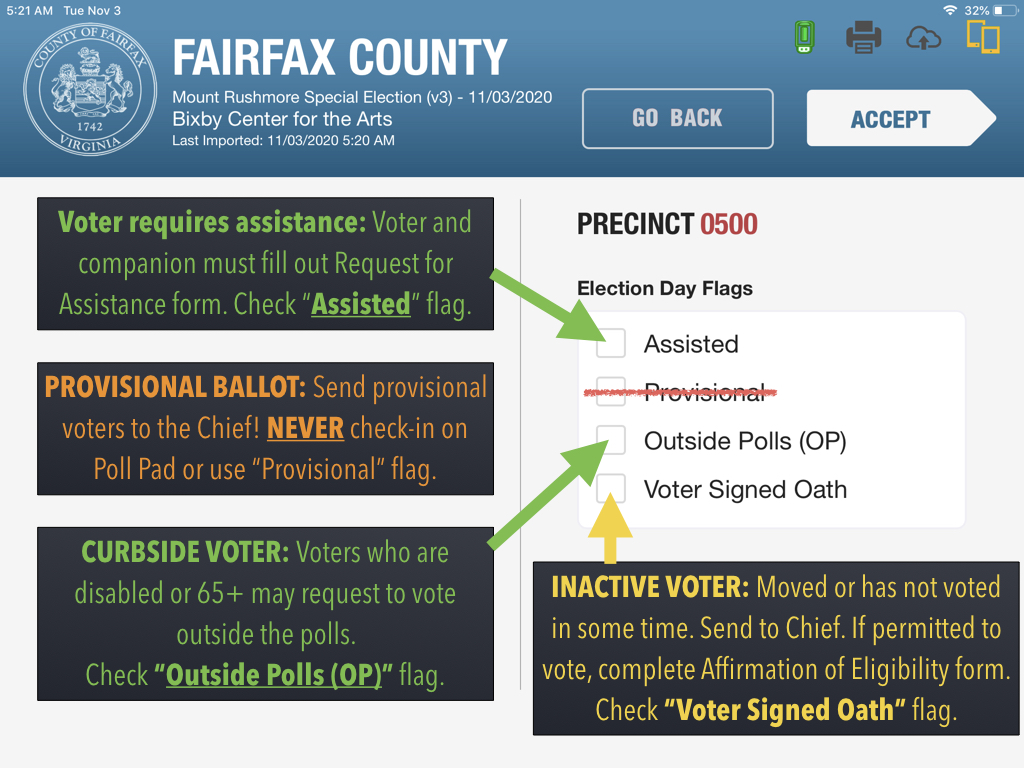
When you select a voter to check-in, you will also be presented with four possible "flags":
- ASSISTED flag: If a voter requires assistance in marking their ballot, send them to the Chief who may select this flag. The voter and their assistant must complete a "Request for Assistance" form.
- PROVISIONAL flag : Send provisional voters to the Chief. You will NEVER use this flag or check-in provisional voters. (This software is used by many jurisdictions and we are currently unable to disable the Poll Pad flag.)
- OUTSIDE POLLS (OP) flag: If the Chief asks you to check-in a "curbside voter", select this flag. A curbside voter is someone who is disabled or 65+ years of age and requests to stay in their car and vote outside the polls. (Do not question someone if they ask to vote curbside.)
- VOTER SIGNED OATH flag : If someone is an "Inactive voter", send them to the Chief who may select this flag. Someone may become Inactive if they moved or have not voted in 2 consecutive federal elections. If they are permitted to vote, they must compete an Affirmation of Eligibility form (also known as an oath).
Don't forget - the last step to checking in a voter is pressing the 'Accept' button!
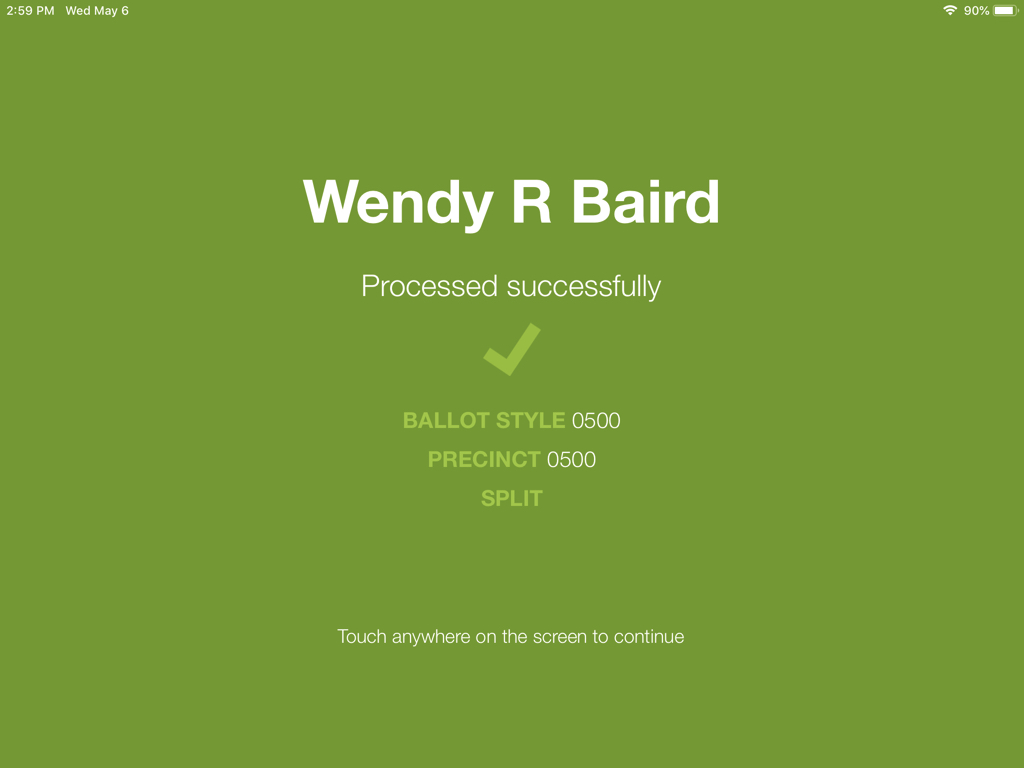
When you press "Accept" to officially check-in a voter, you will be presented with a full-screen green screen. Touch anywhere on the screen to continue.
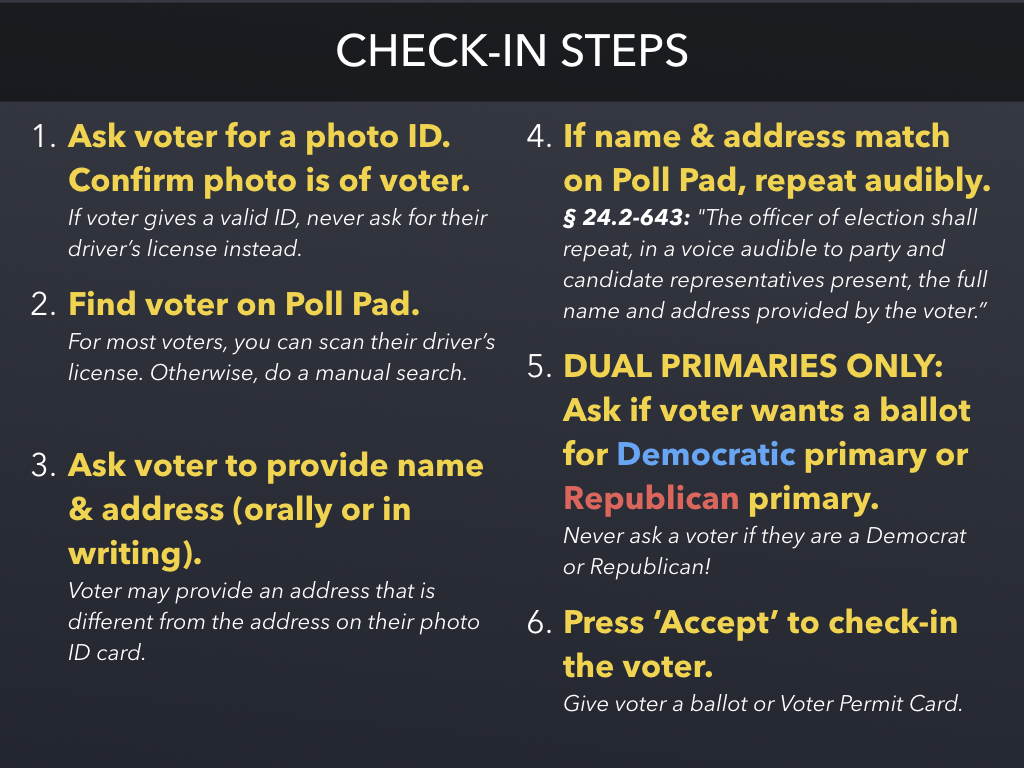
Now that you know which IDs are acceptable and how to use a Poll Pad, it's important to understand the full order of steps to checking-in a voter.
- Ask the voter for their photo ID. Confirm the photo is of the voter. Remember, if a voter provides a different valid form of ID, you cannot ask for their driver's license.
- Find the voter on the Poll Pad. Scan their driver's license or do a manual search.
- Ask voter to provide name & address. Most voters will provide this information orally, but they also have the option of providing this information in writing or simply pointing to their ID. And remember, you always use the address the voter provided during check-in when looking at the Poll Pad.
- Confirm the name & address match the Poll Pad, then repeat them audibly. The Code of Virginia requires us to state this information out loud.
- If the election is a dual-party primary, ask if the voter wants a ballot for the Democratic primary or Republican primary. Never ask a voter if they are a Democrat or Republican! In Virginia, voters do not register by party and are eligible to vote in whichever party's primary they prefer each election.
- Finally, check in the voter. Hand them a ballot or a Voter Permit Card. (A Voter Permit Card is exchanged for a ballot at the Ballot Table.)
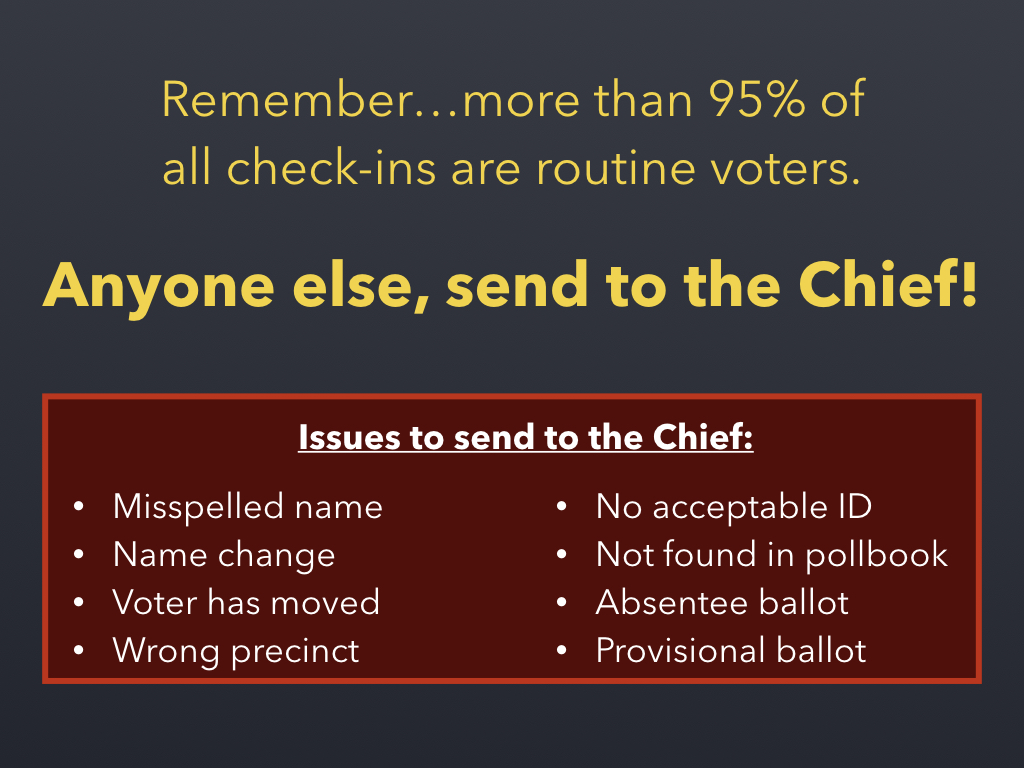
Remember, MOST check-ins are very simple. For the ones that aren't, just refer the voter to the Chief.
Some issues that you may encounter that you should refer to the Chief include:
- If the voter's name is misspelled in the pollbook or they had a name change,
- If the voter has moved or is in the wrong precinct,
- If the voter has no acceptable ID,
- If the voter cannot be found in the pollbook,
- If the voter requested an absentee ballot but is at the polling place,
- And, of course, anything related to provisional ballots.
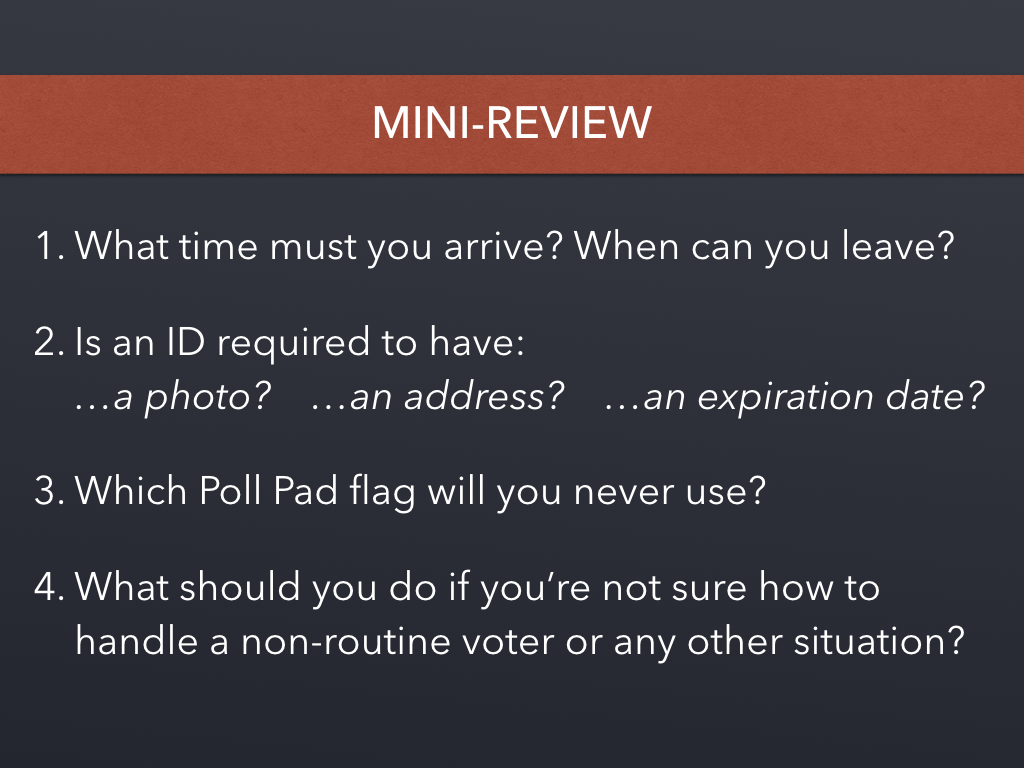
Let's do a quick review. Take a moment to think about these questions before you read the answer below.
- What time must you arrive? When can you leave? All election officers must arrive no later than 5:00 AM and stay until the Chief dismisses everyone.
- Is an ID required to have: …a photo? …an address? …an expiration date? A voter's ID is required to have a photo. It does not have to have an address (in fact, if there is an address present, you will ignore it in favor of the address the voter provides orally or in writing). It does not have to have an expiration date (but if there is one visible, it must not be expired more than 12 months).
- Which Poll Pad flag will you never use? You will never use the Provisional flag on the Poll Pads. Always send provisional voters to the Chief.
- What should you do if you're not sure how to handle a non-routine voter or any other situation? If you're not sure about anything on election day, just say one simple word: "CHIEF!" Again, Chiefs and Assistant Chiefs are trained to handle all non-routine situations.
We will now go over Ballot types and the ExpressVote accessible ballot marking device.
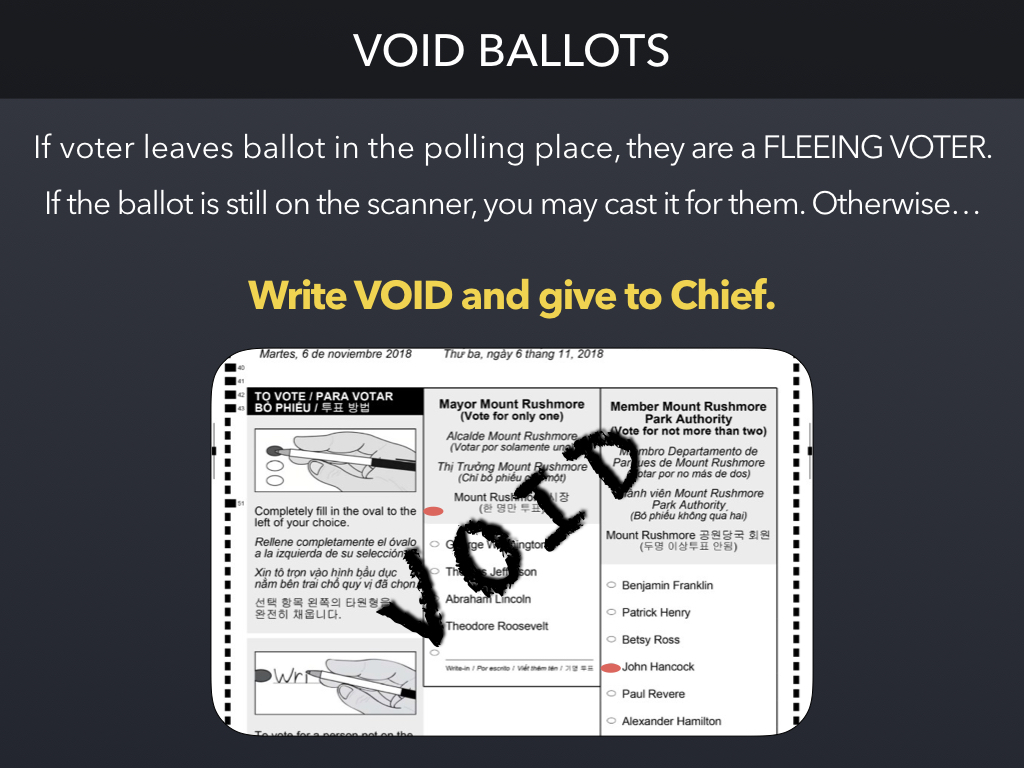
Sometimes, a voter does not complete the process of voting.
If a voter leaves their ballot in the polling place, they are a FLEEING VOTER. If they left the ballot on the DS200 scanner, you may cast it for them. Otherwise, write VOID in large letters across the face of the ballot and give it to the Chief.
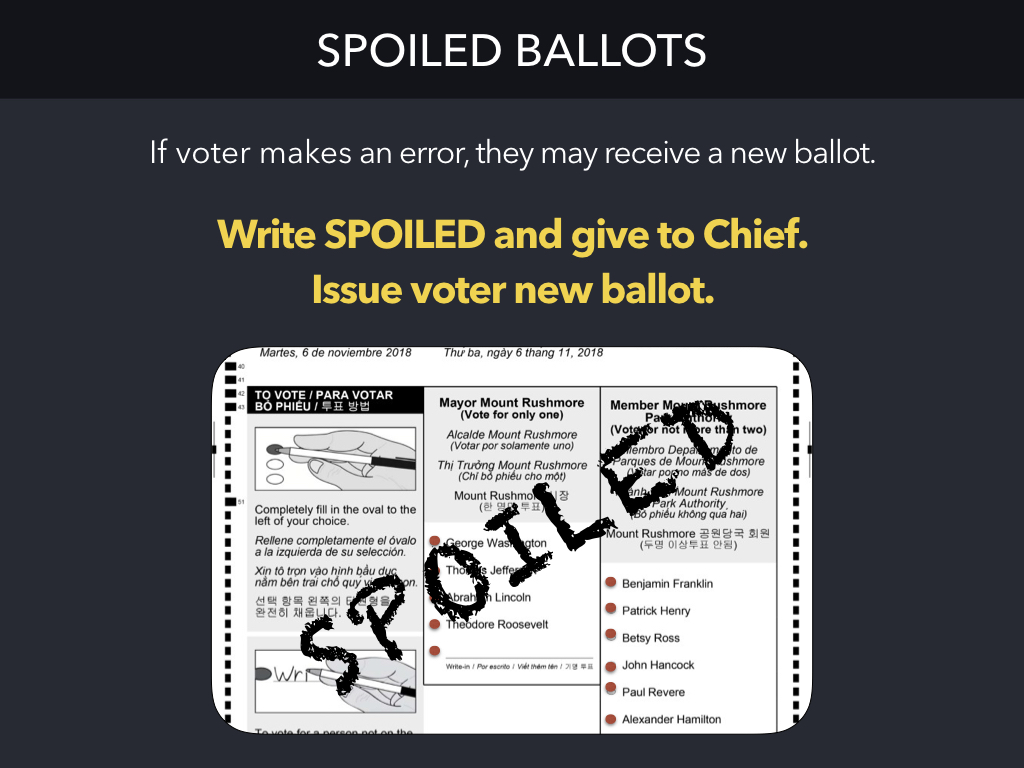
If a voter makes an error on their ballot, they may ask for a new ballot. First, if the voter made selections in any contests, ask them to fill in all bubbles in those contests so no one knows who they intended to vote for. Next, write SPOILED in large letters across the face of the ballot. Give the spoiled ballot to the Chief and issue a new ballot to the voter.
If a voter marked outside of the bubbles or made erroneous marks on the ballot, the DS200 scanner may reject it because it is unreadable. In this situation, you would follow the same steps to SPOIL the ballot and issue a new ballot to the voter.
If a voter has repeated issues marking a ballot correctly, you may want to suggest using the ExpressVote accessible marking device.
There is one other situation in which a ballot may be spoiled: If a voter requested a mailed absentee ballot, but then wants to vote in-person on election day. The voter can bring their absentee ballot (marked or unmarked), spoil it, and surrender it in exchange for a new ballot on election day.
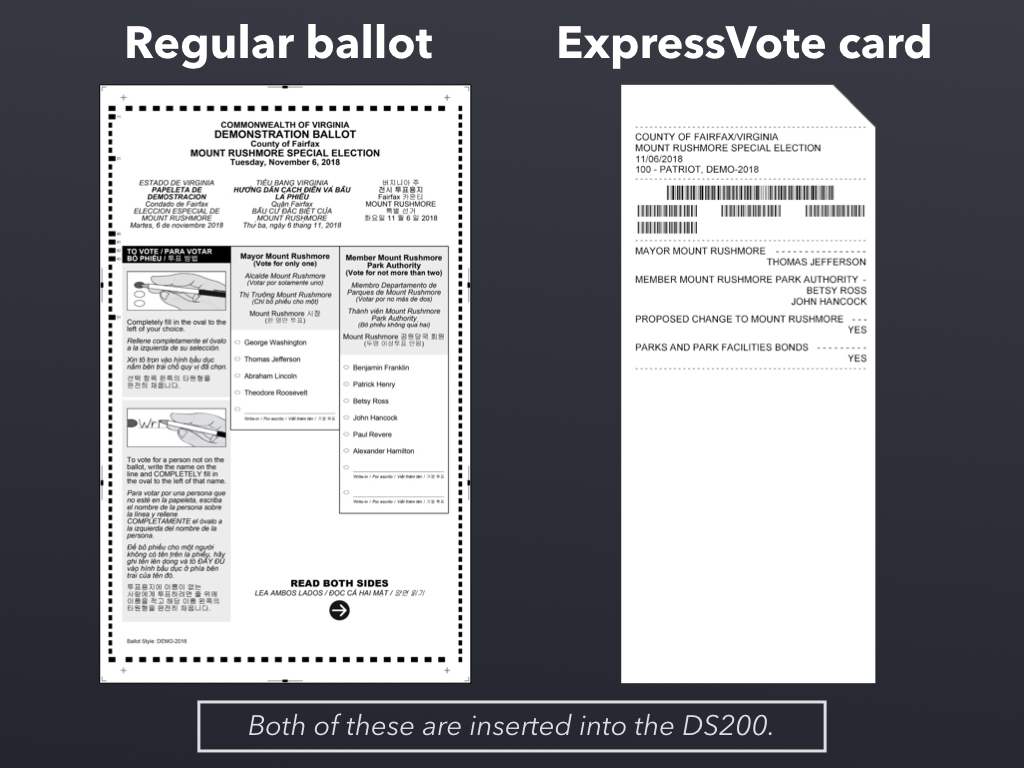
Until now, you have likely only been familiar with the regular ballot.
But remember, if a voter chooses to use the ExpressVote accessible marking device, it prints a marked ballot card that voters can then scan themselves. This printed ballot card is equivalent to a regular ballot.
To be counted, either of these ballot types must then be inserted into a DS200 scanner.

The ExpressVote is an accessible marking device. It marks and prints a ballot for the voter, who then inserts the printed ballot card into a DS200 to be scanned and counted. So it's like a large pen!
The ExpressVote is ADA-compliant and offers voters multiple options, including displaying the ballot in multiple languages. The voter can use the touchscreen, audio cues, or the Braille directional pad to make vote selections.
Any voter may choose to use the ExpressVote! Do not question someone's disability or motivation for using an ExpressVote.
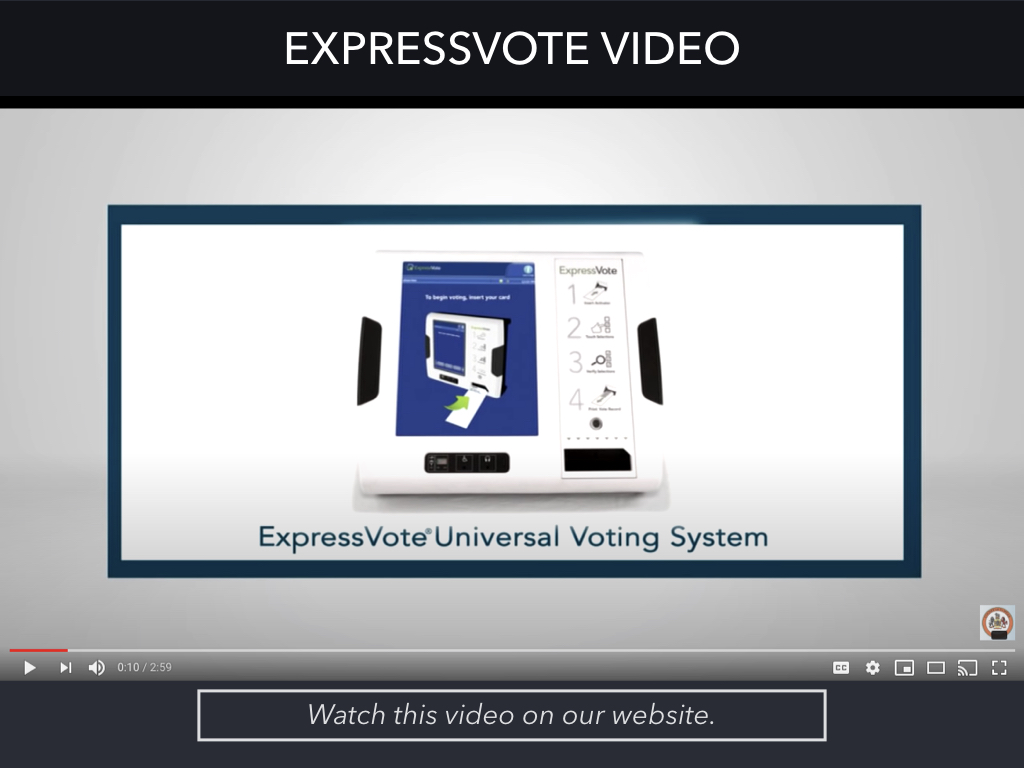
Watch this video to understand how to use an ExpressVote: https://youtu.be/4NNn7NcpaOU
Summary:
- STEP 1 : Insert a blank ballot card into the ExpressVote. Align the corner-cut on the card with the corner-cut on the machine.
- STEP 2 : Make selections. The voter selects a candidate or option for each contest. Press the "Next" button to go to the next contest. To enter a write-in candidate, press the "Write-In" button to reveal a keyboard. If you have visual limitations, you can press the "Contrast" button to change the screen to high-contrast black-and-white. Press the "Zoom" button to make the ballot appear larger on the screen. You can also display the ballot in different languages or use a physical keypad to make selections.
- STEP 3 : Review selections. After you have made your selections, you can review them before printing your ballot card. You can make changes if needed.
- STEP 4 : Print marked ballot. Press the "Print Card" button and your printed card will be returned to you.
- STEP 5 : Scan ballot. Insert your marked ballot card in the DS200 scanner to have your ballot counted.
We will now go over the DS200 digital scanner used to scan ballots and tabulate votes.
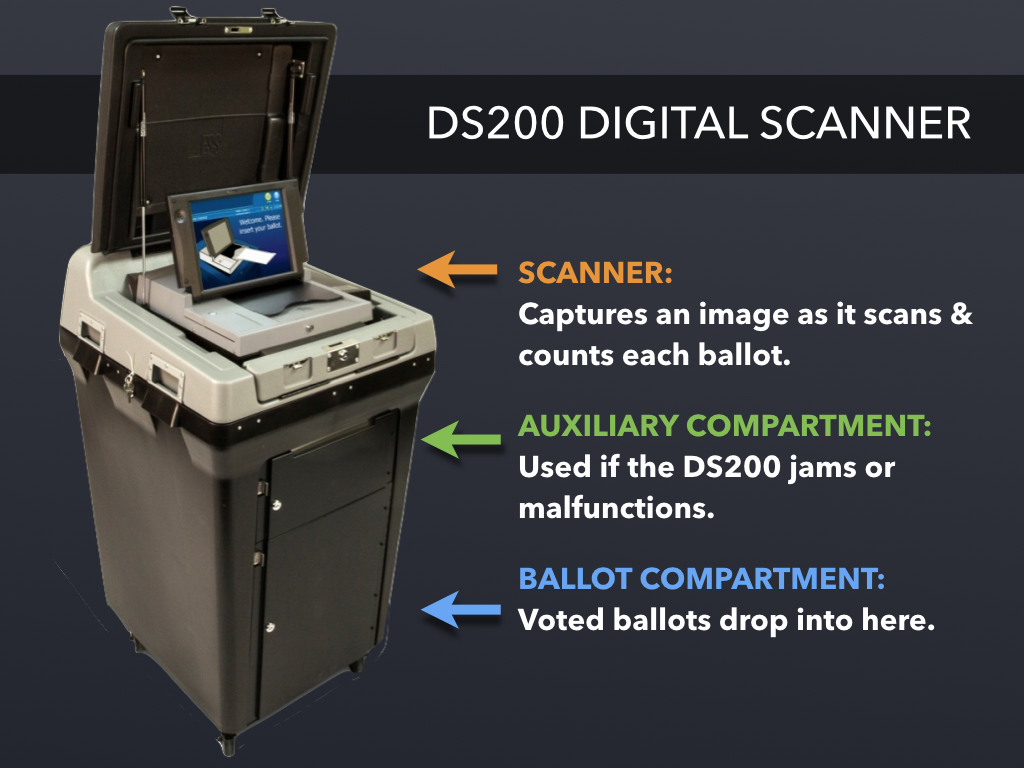
This is the DS200 digital scanner. It's actually a very simple machine:
- There is a Scanner at the top, which scans and counts each ballot.
- The ballots then drop into the Ballot Compartment below.
- There is also an Auxiliary Compartment on the front. If the DS200's scanner malfunctions or jams, the Chief can unlock this compartment and voters can temporarily insert ballots here instead. At the end of the day, election officers would remove these ballots and insert them into the scanner (if it is now working) or hand-count them.
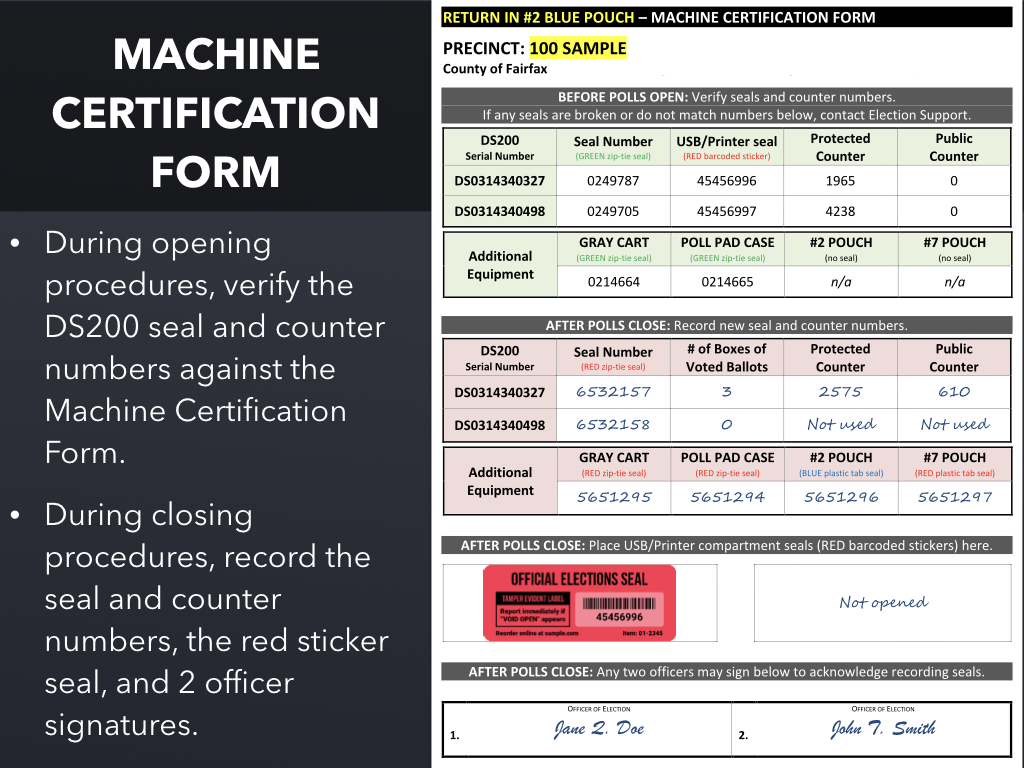
This is the Machine Certification Form. As you open and close your DS200s on election day, you will need to use this form.
During opening procedures, election officers will compare the pre-printed seal and counter numbers in the green table to those on the DS200 to ensure they match. If the numbers do not match, stop and notify your Chief, who will contact our office for next steps.
During closing procedures, election officers will record all required numbers in the red table on the form, place the red sticker seal on the form, and have any 2 officers sign the bottom of the form.
Let's go through all steps for opening a DS200. As this is an online class, we understand it will be difficult to understand all of these steps without practicing with an actual machine. But don't worry! The Chief, Assistant Chief, and many other officers will have experience doing this before. The Chief will provide election officers assigned to open the DS200 with printed instructions, the Machine Certification Form, the keys, and a password card.
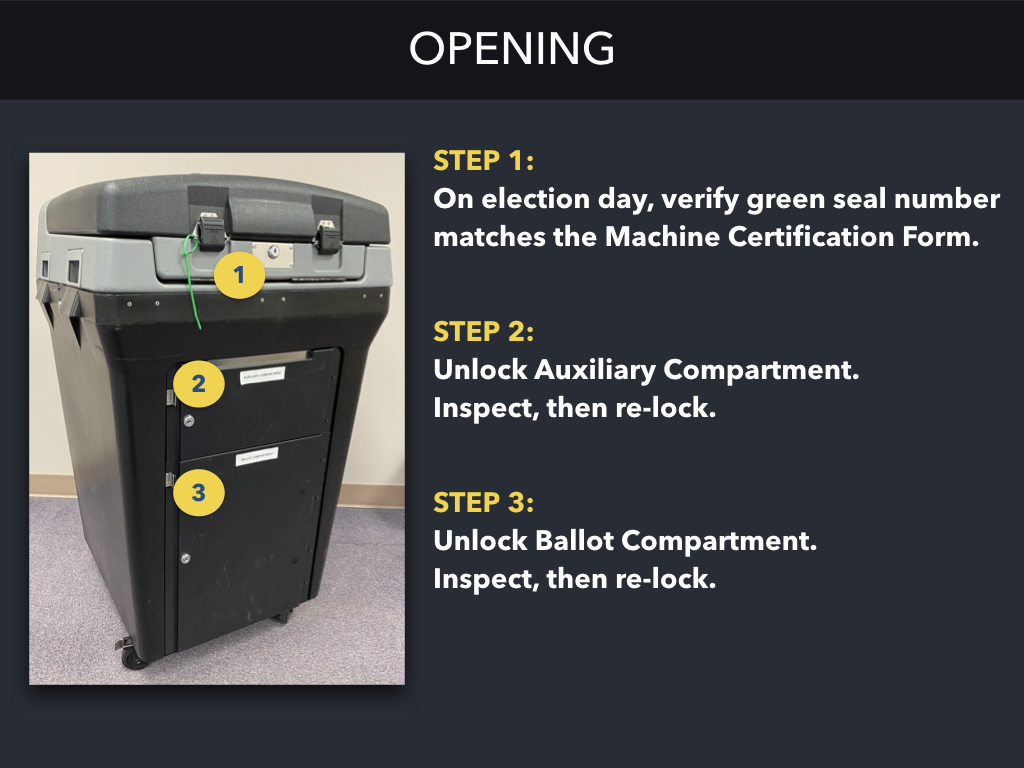
- STEP 1 : The DS200 will be closed and secured with a green zip-tie seal. An election officer will confirm the seal number matches the Machine Certification Form. If it matches, cut the seal. Otherwise, contact the Chief.
- STEP 2 : An election officer will unlock the Auxiliary Compartment. Look inside to verify the compartment is empty (there should be no ballots inside), then re-lock it.
- STEP 3 : An election officer will unlock the Ballot Compartment at the bottom. Again, look inside to verify the compartment is empty, then re-lock it.
Let's continue the steps to open a DS200.
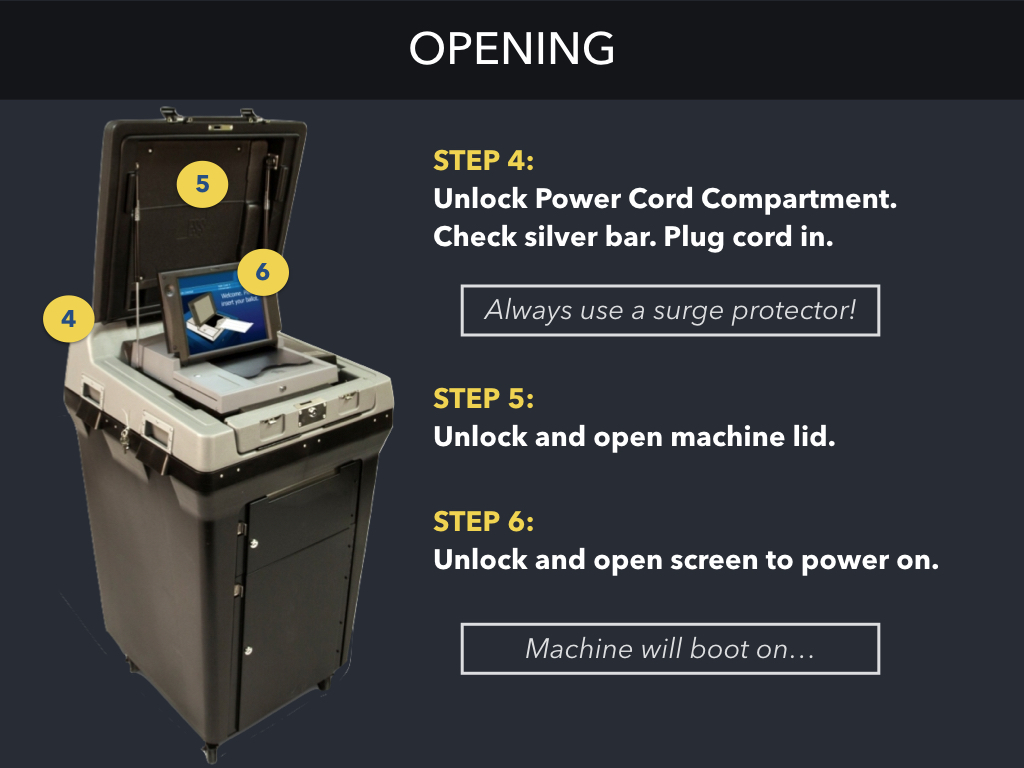
- STEP 4 : On the back of the DS200, open the Power Cord Compartment. There is a silver bar which helps guide ballots into the proper compartment. Verify it is in the locked-down position. It starts that way at our warehouse but can sometimes become dislodged during transport. If all looks well, remove the power cord and plug it in. Remember to always use a surge protector between the power cord and the wall outlet! Leave this compartment open during the day.
- STEP 5 : Unlock and open the black machine lid.
- STEP 6 : Unlock and lift up the screen. The scanner will automatically power on.

Let's continue the steps to open a DS200.
- STEP 7 : Carefully enter the election code from the password card (it is case-sensitive). A configuration report will print. Do not tear off this report yet.
- STEP 8 :Press the green OPEN POLL button to print the Zero Totals Report, which verifies no votes have been cast on the machine. Tear off the entire tape. Two officers must sign the tape and give it to the Chief.
We're almost done opening a DS200!
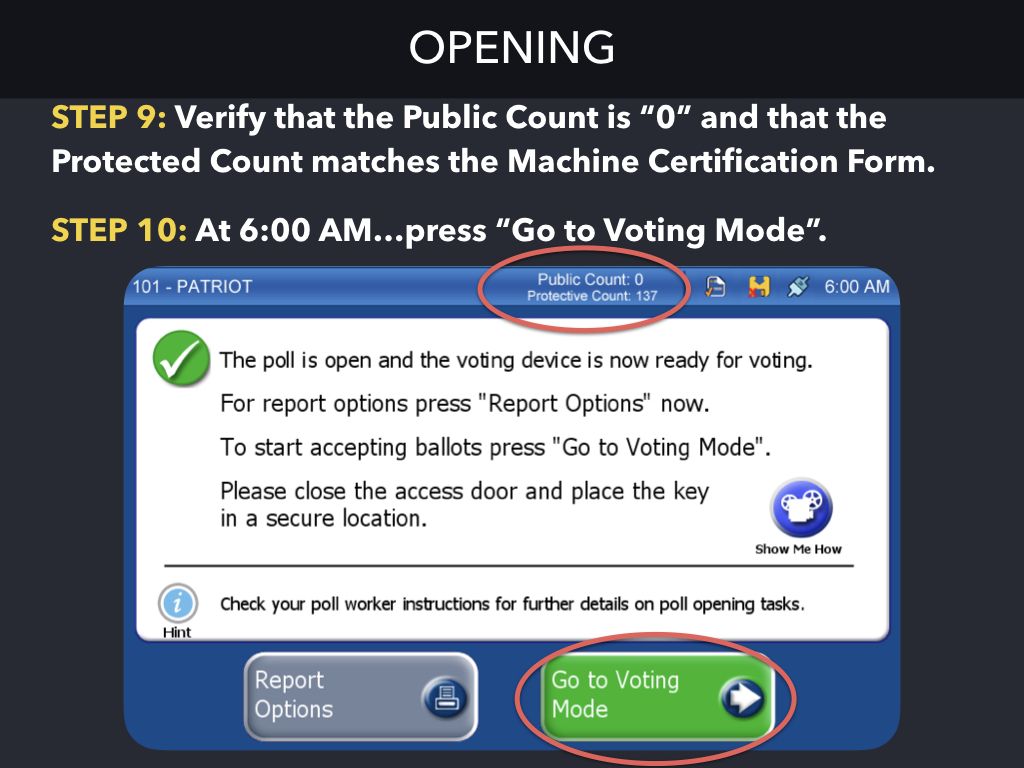
- STEP 9 : Verify that the "Public Count" at the top of the screen is zero. The Public Count indicates the number of votes cast in the current election on this machine - at the start of the day, it will always be zero! Also verify the "Protected Count" matches the number pre-printed in the green table on the Machine Certification Form. This number is like a car odometer - it tells you how many ballots have been cast in the lifetime of this machine, across all elections. If the number does not match, call the Chief.
- STEP 10 : At 6:00 AM on election day, press the green "Go to Voting Mode" button. The DS200 is now ready to accept ballots!
Be sure to return all materials to the Chief, including the signed tapes, the cut green zip-tie seal, the printed instructions, the Machine Certification Form, and the DS200 keys.
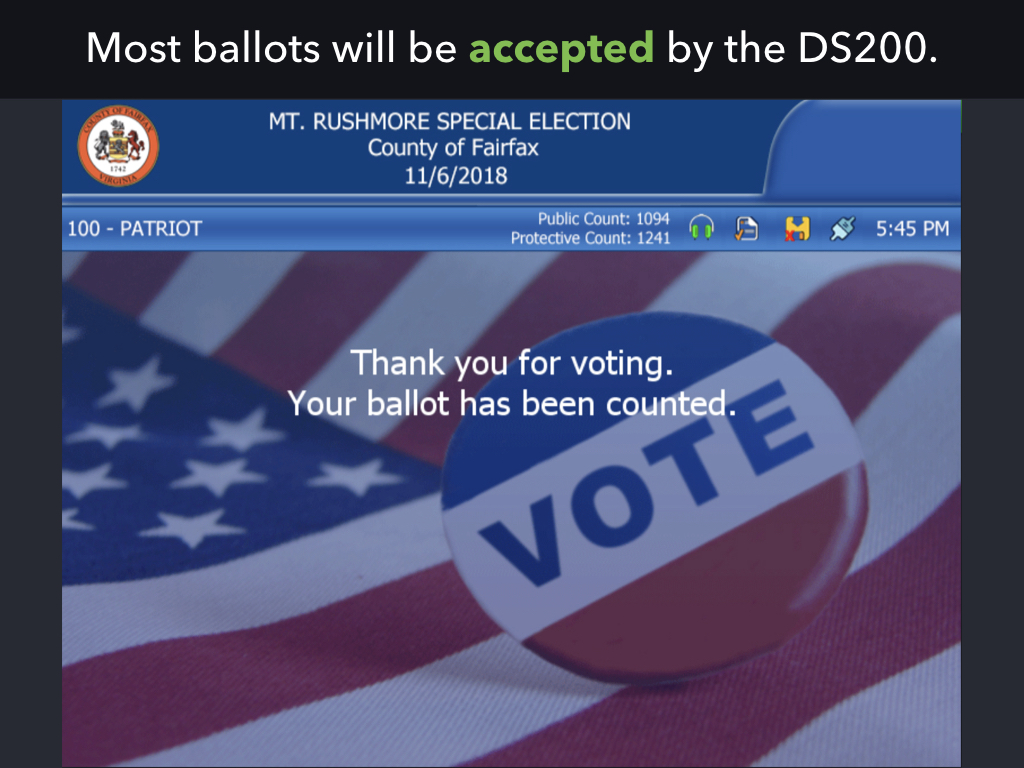
When a voter inserts a regularly marked ballot , the DS200 will accept and scan it. Voters should be encouraged to wait at the machine until they hear a "clunk" sound as the ballot drops inside and the "Thank You" screen is displayed.
You will also see this screen if the voter has an under-voted ballot. This means the voter voted for fewer candidates or contests than they were allowed. For example, in a presidential election, some voters will only vote for president and no other contests on the ballot. Again, in this case, the DS200 will accept the ballot without issue and the "Thank You" screen is displayed.
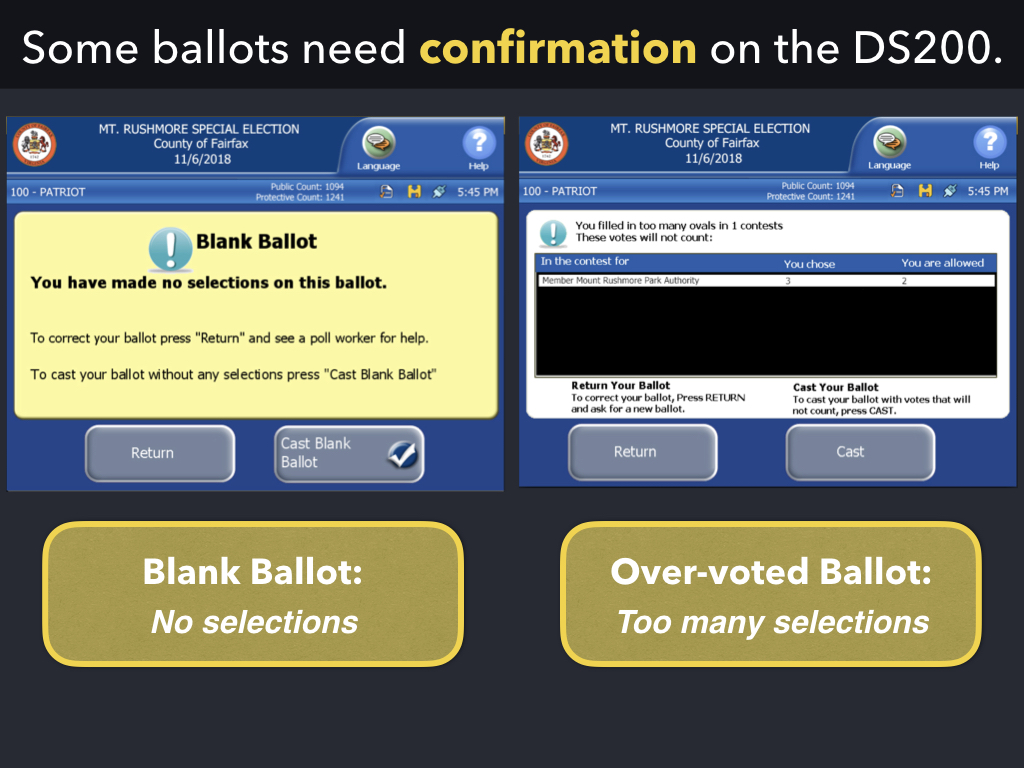
Most ballots should be accepted by the scanner without issue. However, there are a few cases when the scanner will ask for additional confirmation before accepting the ballot.
One situation is if the voter inserts a blank ballot. This may happen if the voter accidentally does not mark their ballot or perhaps wishes to cast a blank ballot as a protest vote. In this case, the DS200 will confirm they want to cast a blank ballot or give them the option to return the ballot and allow them to vote.
Another situation is an over-voted ballot. This happens when a voter filled in too many ovals in one or more contests. For example, they were only supposed to select one candidate for Mayor, but they couldn't decide and filled in ovals for two candidates. The DS200 will give them the option to cast the ballot as it is, informing the voter that the over-voted contests will not be counted (other properly-voted contests will be counted). Or the DS200 can return the ballot to the voter, which they can SPOIL and exchange for a new ballot.
In both of these situations, clear visual and audio cues will indicate the scanner did not accept the ballot. If you're not sure how to handle them, remember your favorite word: "Chief!"
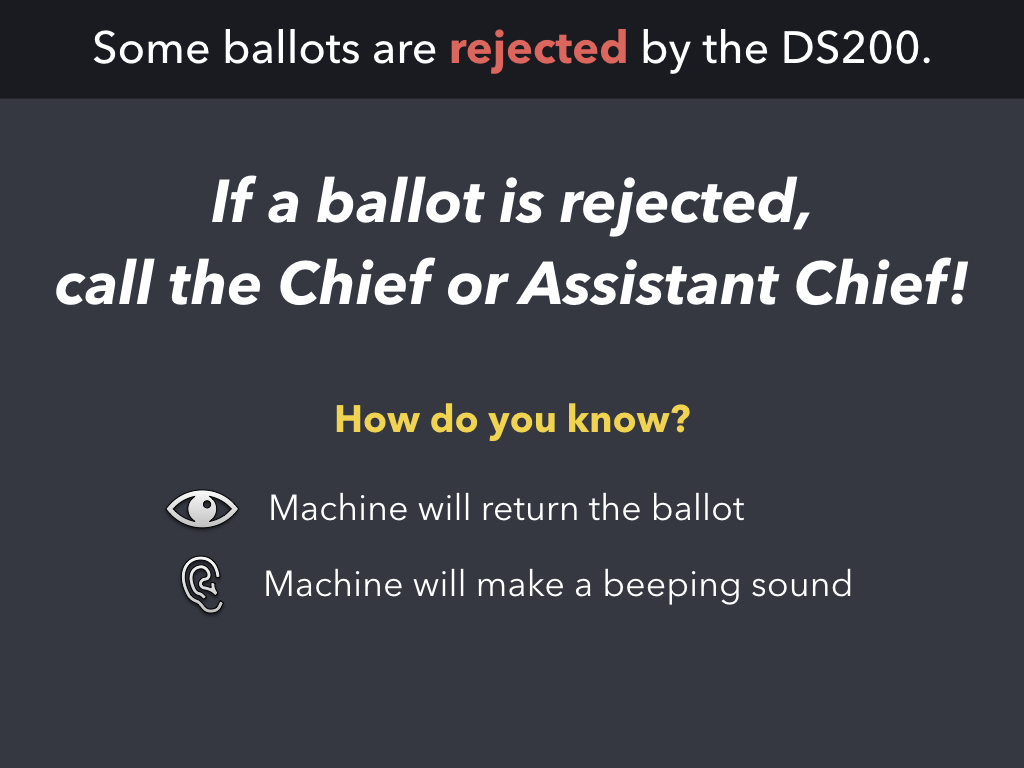
Finally, some ballots may be rejected entirely by the DS200.
The most common situation is a mismarked ballot. This is when a voter has made erroneous marks outside the ovals which prevent the scanner from properly reading their selections. In this case, the DS200 will return the ballot, make a loud beeping sound, and display an error screen.
If this happens, call the Chief or Assistant Chief. They will review the situation and likely help the voter SPOIL the ballot and issue them a new ballot.
Now let's go through all the steps for CLOSING a DS200 scanner. The Chief, Assistant Chief, and many other officers will have experience doing this before. The Chief will provide election officers assigned to close the DS200 with printed instructions, the Machine Certification Form, the DS200 keys, a red zip-tie seal, and empty voted ballot boxes.
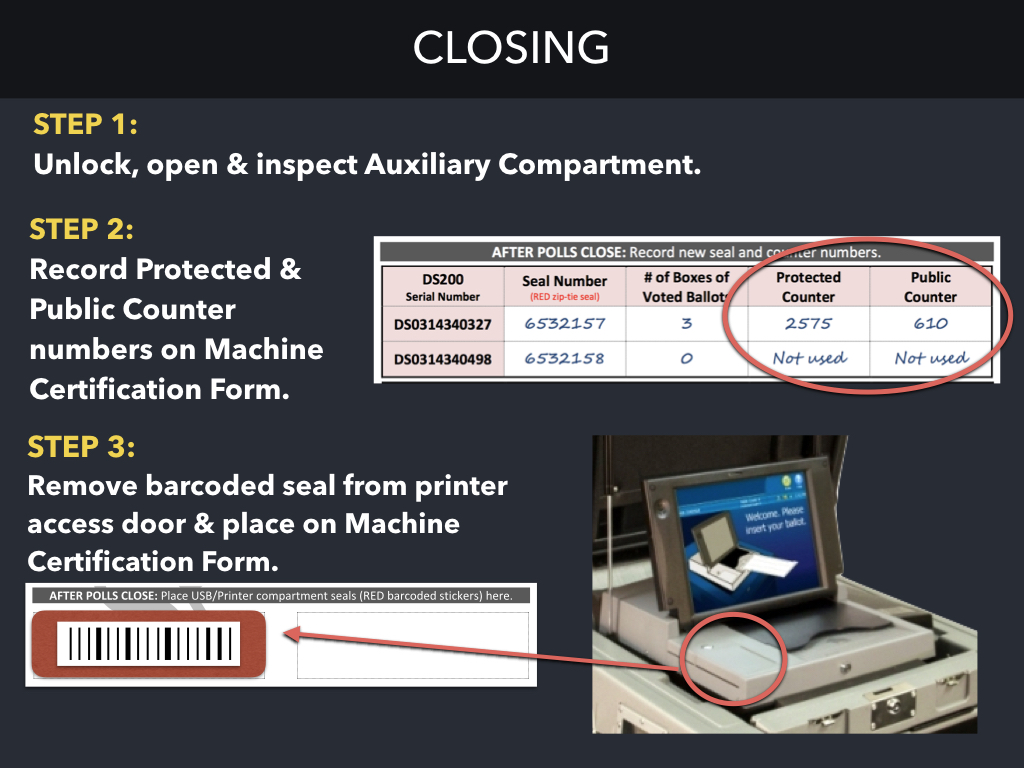
- STEP 1 : Always open the Auxiliary Compartment and look for any ballots, even if you don't think it was used during the day. If there are any ballots inside, call the Chief, who will guide you through scanning them properly. Otherwise, re-lock it.
- STEP 2 : Look on the DS200 screen for the "Protected Count" and "Public Count" of ballots cast. Record these numbers in the red table on the Machine Certification Form. If your precinct received a second DS200 but did not use it, you would write "Not used" in this area on the Machine Certification Form.
- STEP 3 : There is a red barcoded sticker seal covering the printer access door on the DS200. Remove this sticker seal and place it on the Machine Certification Form.
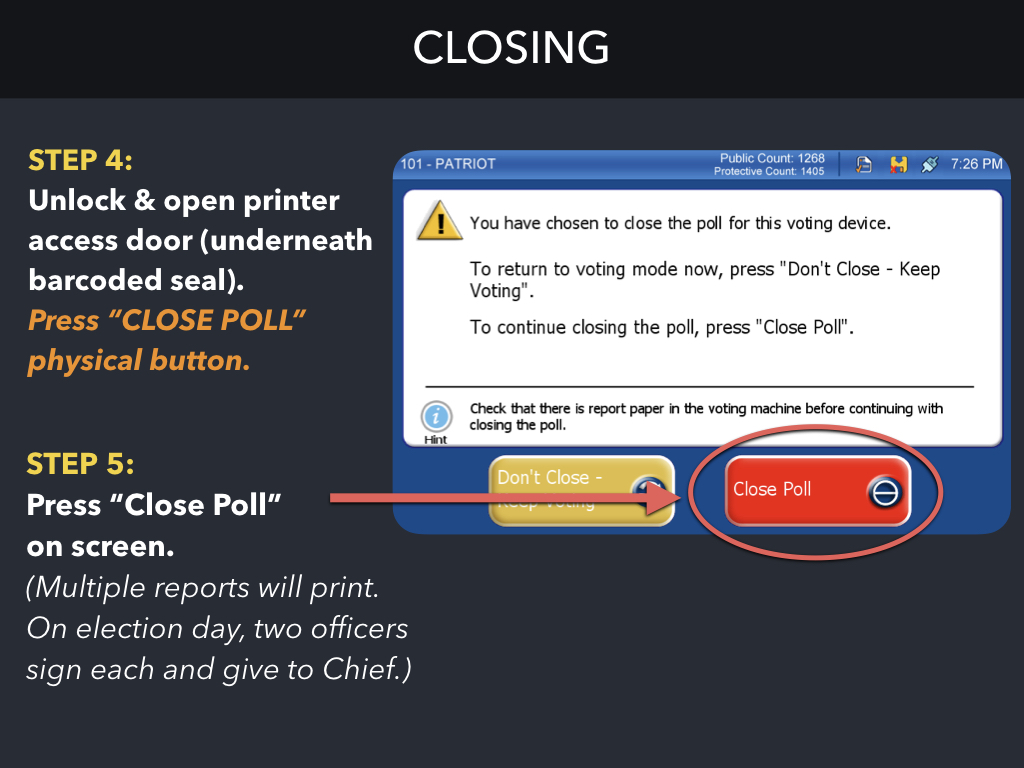
Let's continue the steps to close a DS200.
- STEP 4 : Now that you have removed the red sticker seal on the DS200's printer access door, unlock and open it. Inside, there is a physical button labeled "Close Poll". Press it.
- STEP 5 : The DS200 screen will update and ask for confirmation that you want to close polls. Press the red "Close Poll" button on the screen. Multiple reports will now print. After all reports have printed, tear them off in one piece. Two officers should sign at the bottom of each report, then give them to the Chief.
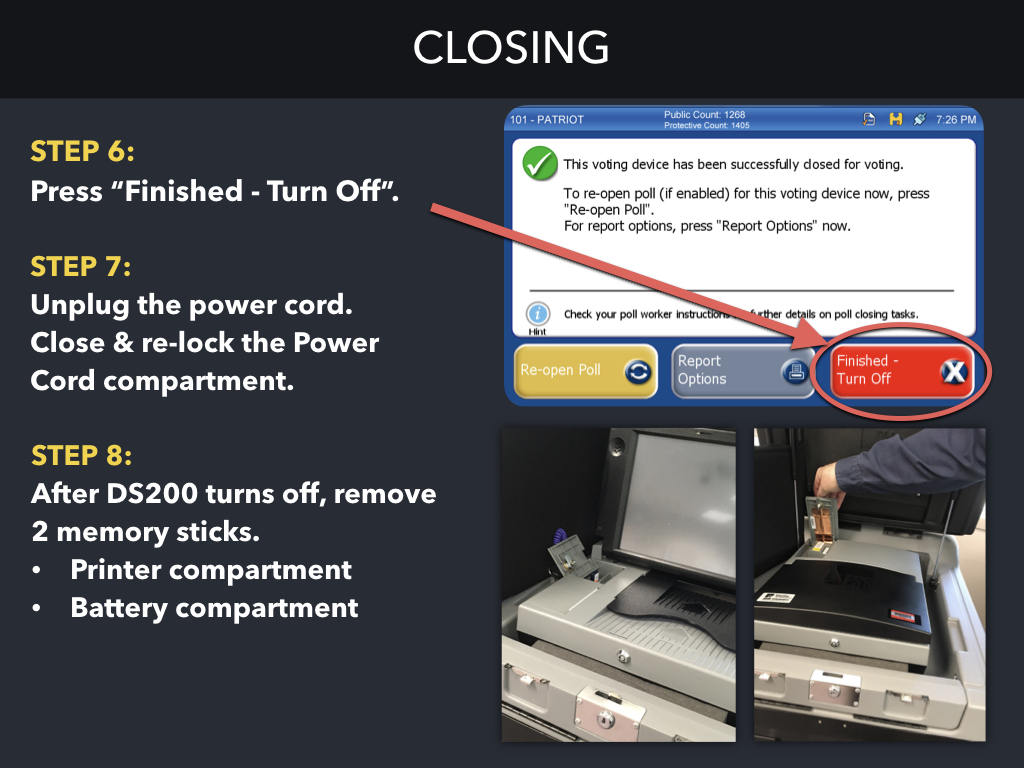
Let's continue the steps to close a DS200.
- STEP 6 : After all reports have printed, press the red "Finished - Turn Off" button on the screen.
- STEP 7 : Unplug the power cord from the wall. Close and re-lock the Power Cord Compartment on the back of the DS200.
- STEP 8 : After the DS200 powers off, remove the memory stick in the Printer Compartment (which is in front of the screen) and remove the memory stick in the Battery Compartment (which is behind the screen).
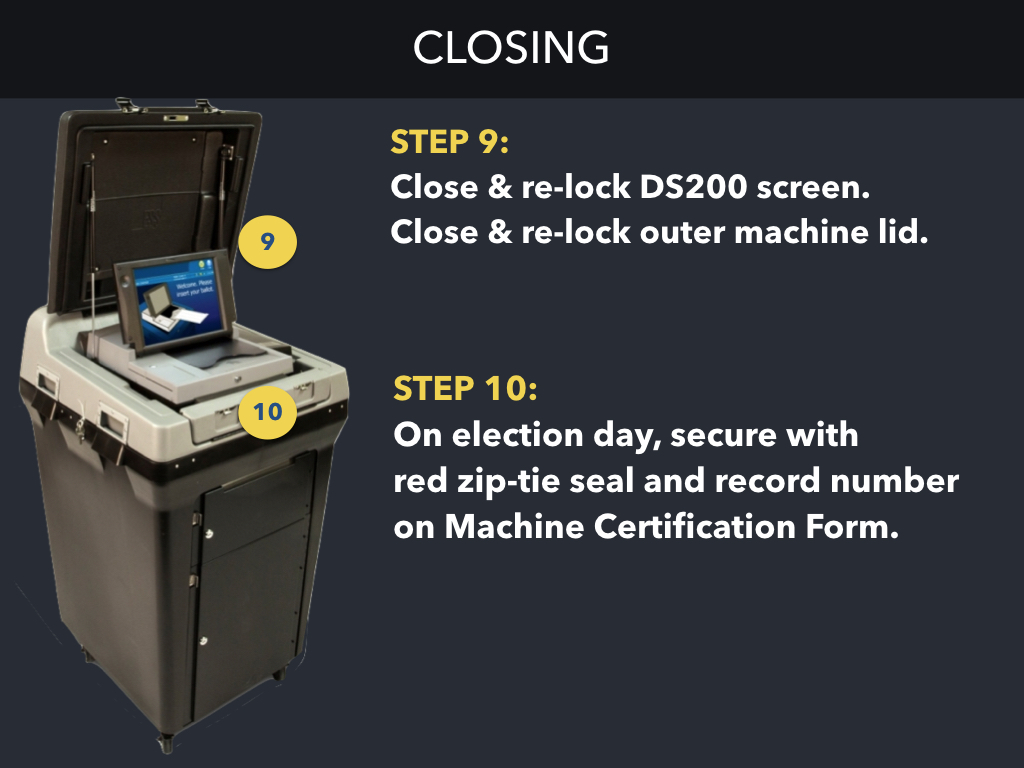
You're almost done! Now it's time to seal up the machine.
- STEP 9 : Close and re-lock the DS200 screen. Then close & re-lock the black outer machine lid.
- STEP 10 : Seal the machine with a red zip-tie seal. Record the seal number in the red table on the Machine Certification Form.

The last step is to unlock and open the Ballot Compartment. With multiple officers present, carefully move all voted ballots into the voted ballot boxes and seal them. The Chief will return these ballots on election night and they will be transported to the courthouse for safekeeping.
Be sure to return all materials to the Chief, including the signed tapes, the 2 memory sticks, the printed instructions, the Machine Certification Form, and the DS200 keys.
You have now successfully learned how to open, use, and close the DS200 scanner on election day.
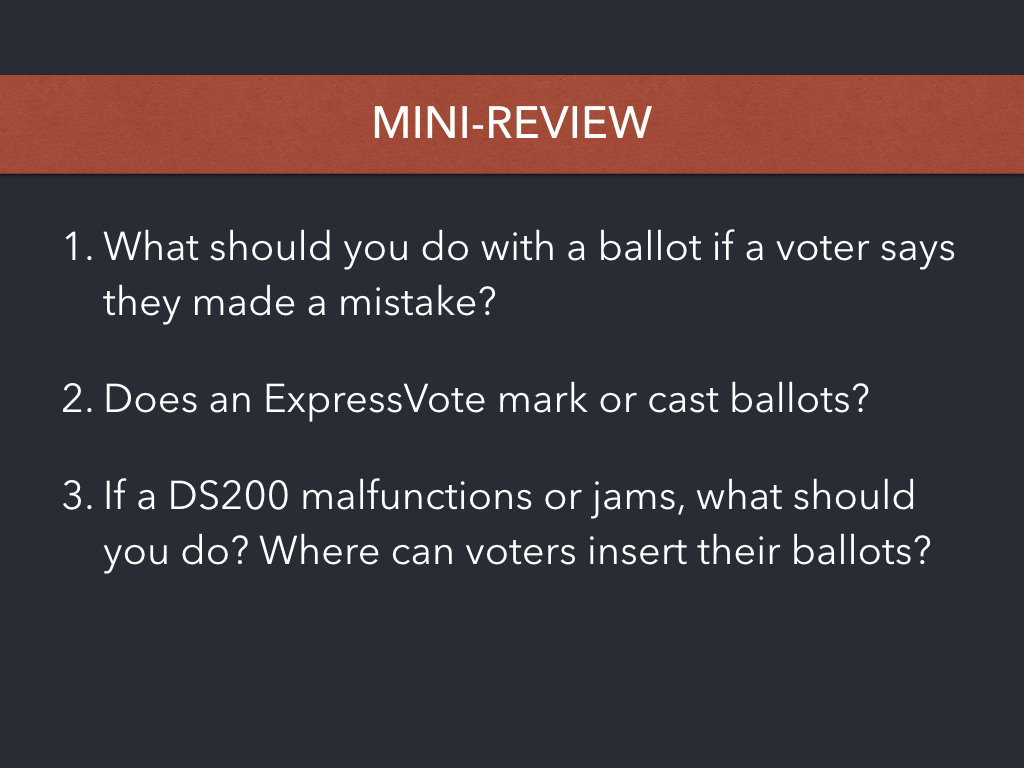
Let's do a quick review! Take a moment to think about these questions before you read the answer below.
- What should you do with a ballot if a voter says they made a mistake? If a voter made a mistake on their ballot, you should SPOIL the ballot and issue them a new ballot.
- Does an ExpressVote mark or cast ballots? An ExpressVote only marks a ballot. To be counted, the ballot must still be inserted in a DS200 scanner.
- If a DS200 malfunctions or jams, what should you do? Where can voters insert their ballots? If a DS200 malfunctions, call the Chief! They are trained to handle all non-routine issues and can call technical support if needed. In the meantime, voters can insert their ballots in the DS200's Auxiliary Compartment.
We will now go over the final information you need to know to complete this class.
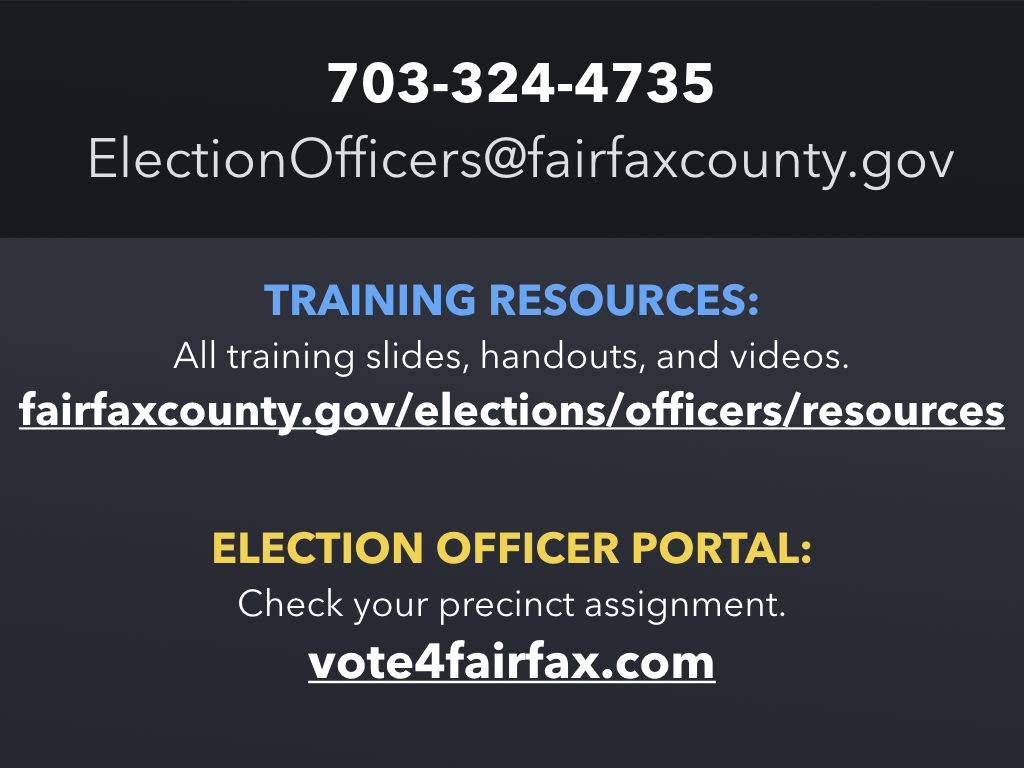
If you need to contact us anytime, call 703-324-4735 or email us.
If you would like to review more training resources, you can find past slides, handouts, and videos on our website at the displayed link.
And finally, as a full-fledged election officer, you can use the Election Officer Portal to indicate your availability each election, enroll in training, and check your precinct assignment.
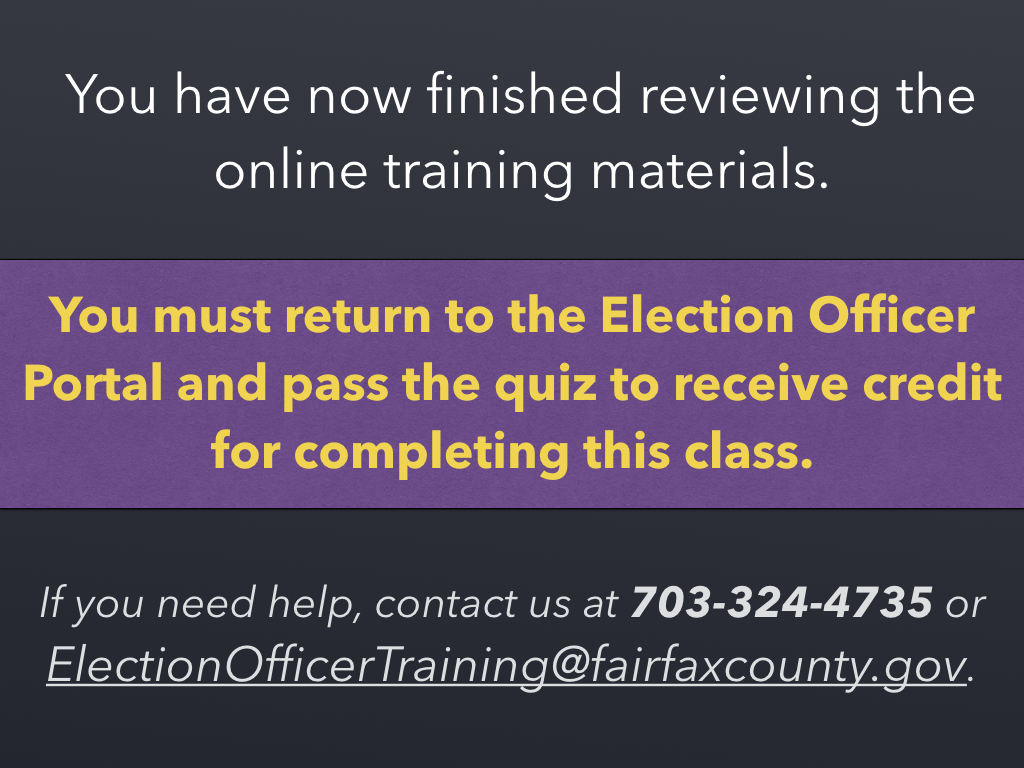
Congratulations! You have now completed the online class for New Election Officers.
To receive credit for this class, you must still take and pass the quiz. You can find the quiz in the Election Officer Portal. Go to the Training tab, scroll down, and look in the bottom-right for a link labeled "Quiz". If you do not pass the quiz the first time, you can take it again until you pass. If you need any help, don't hesitate to call or email us.
This class is now complete. Thank you and we know you'll do great on election day!

Congratulations! You have now completed the online class for New Election Officers.
To receive credit for this class, you must still take and pass the quiz. You can find the quiz in the Election Officer Portal. Login, go to the Training tab, scroll down, and look in the bottom-right for a link labeled "Quiz". If you do not pass the quiz the first time, you can take it again until you pass.
ELECTION OFFICER PORTAL: https://www.vote4fairfax.com
If you need any help, don't hesitate to call us at 703-324-4735 or email us at ElectionOfficerTraining@fairfaxcounty.gov.